
After completing the Goddess's Silent Realm, you receive the Stone of Trials, which gives you access to Sky Keep.
Opening Sky Keep
If you haven't yet opened Sky Keep, go to the stone statue of a bird near the stepping stones on the north side of the eastern lake in Skyloft. Examine the statue to put the Stone of Trials in place of the missing eye. A structure under the Goddess Statue will appear, and some floating Clawshot targets will appear. At the last Clawshot target, you can let go to drop onto the ledge that leads into Sky Keep.
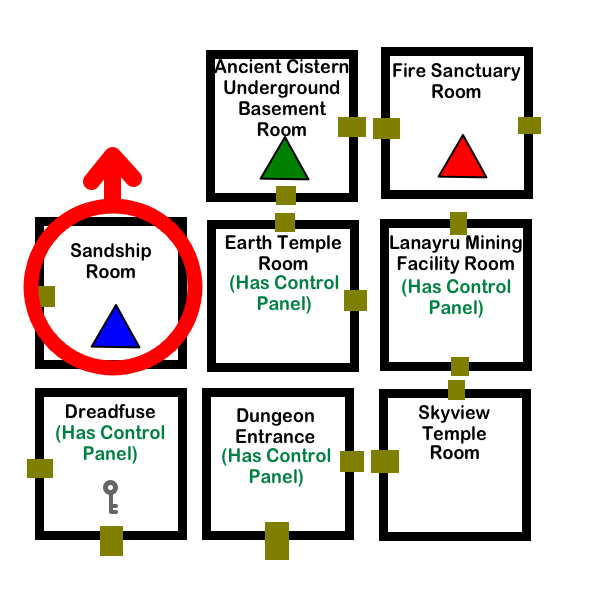
Rearrange the Rooms
Save at the Bird Statue if you wish. Then open the blue chest straight ahead to get the dungeon map. The bars nearby will go down, and Fi will mark the Triforce parts on the map. Go through into the area that the bars were blocking.
Examine the tablet near the door. In this sliding tile puzzle, you can slide the tiles to rearrange the layout of the dungeon. However, you can't reposition the room that you are in, so for that reason, you can only slide the right tile down and the middle tile to the right. You can also move the green Triforce's room to the top-right corner, but you won't be able to do anything in there, so don't bother.
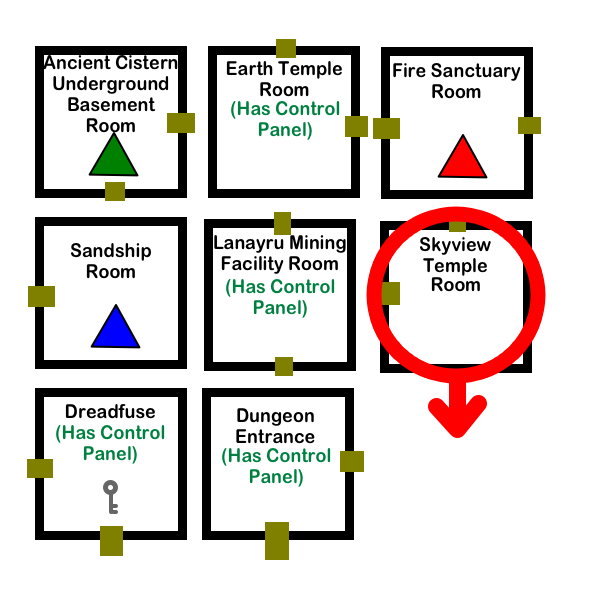
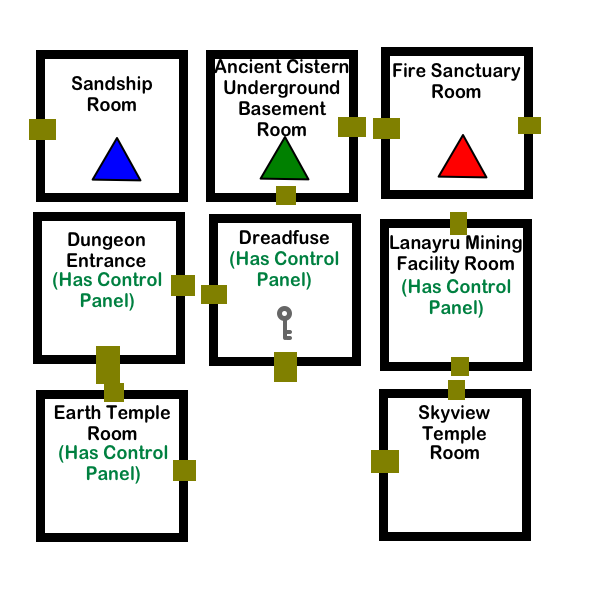
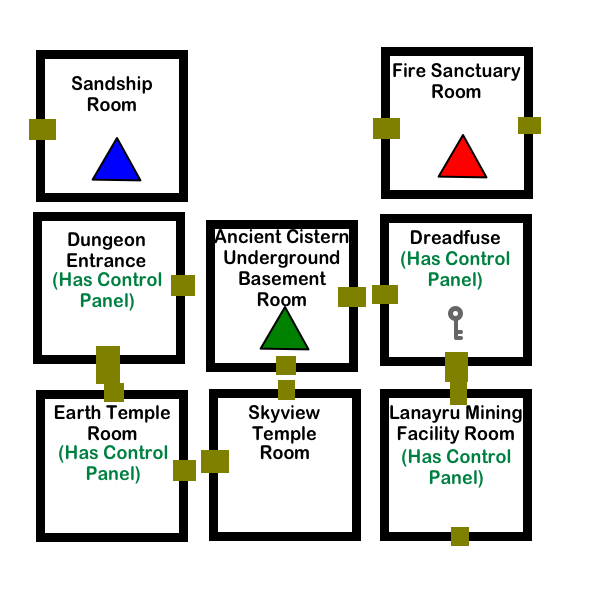
Note: The rooms in Sky Keep represent the dungeons from earlier in the game. You can tell which dungeon each room represents by listening to the music. The rooms in the diagrams on this page are named based on the music that plays in each room.
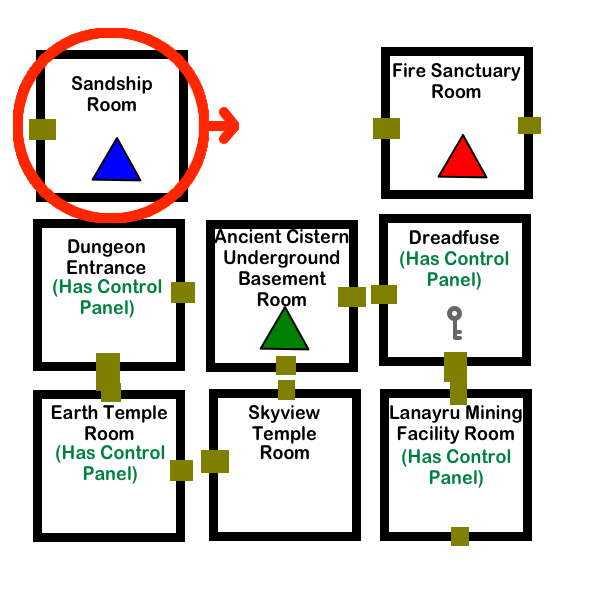
After rearranging the tiles in the puzzle tablet, you can go through the door next to the sliding tile control panel to reach the Skyview Temple Room.
Skyview Temple Room
Go south, kill the Babas, then use the Beetle on the plant holding the rope across the gap. Use the whip on the whip pole, then swing onto the rope that you just cut down, and swing to the other side of the gap.
Do a side slash to make the Skulltula spin, then hit its purple belly with a thrust to kill it.
Use the Clawshots on the rotating vines, then use it again on the other set of rotating vines while avoiding the Furnix. Use the Clawshots on the target on the wall and drop down to the ledge. Then use the Beetle to catch a bomb from the rotating vines and make it explode on the middle of the fire-breathing monsters to kill all three.
Run and jump onto the swinging rope to reach the wooden platform. Use the Gust Bellows to make the platform swing so you can run onto the other wooden platform. From there, use the Gust Bellows to swing the platform so you can jump to the ledge.
Pull down the red bar to give yourself a shortcut. Strum near the butterflies to reveal a Goddess Wall. Save at the Bird Statue if you wish, and finally, go through the door near the Bird Statue.
Lanayru Mining Facility Room
Go west and take the Timeshift Orb, killing the Technoblins that appear. Carry the orb through the spiked barrier. Kill the Sentrobe, then put the orb near the bars, climb the ladder and pull down the red bar up above. Go down and pick up the orb, then step on the switch past where the bars opened, and throw the orb onto the conveyor belt. Then go up the ladder and go north, and step on the switch to retrieve the orb.
Go west through the spiked barrier. Stand on the movable platform and put the Timeshift Orb onto it. Get off of the platform and use the Gust Bellows to move it until it stops at the bars. Step on the red button, then use the Gust Bellows to move the platform past where the bars were. Keep moving the platform until the barrier on the wall disappears and you can shoot the blue target that was behind it. This will open the bars that block your path south.
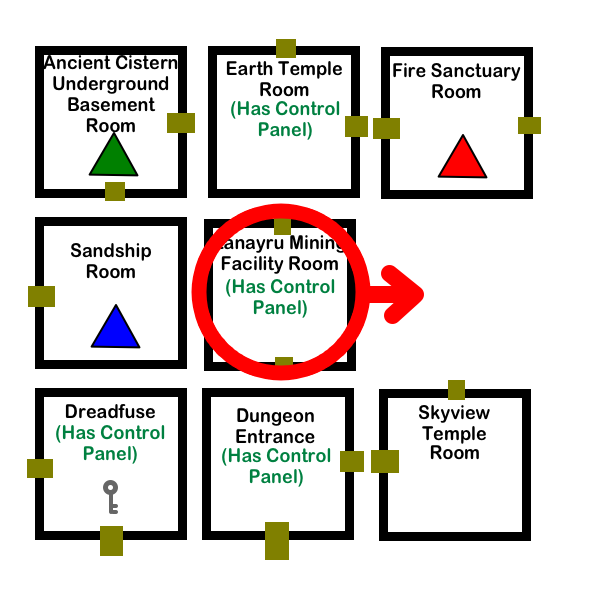
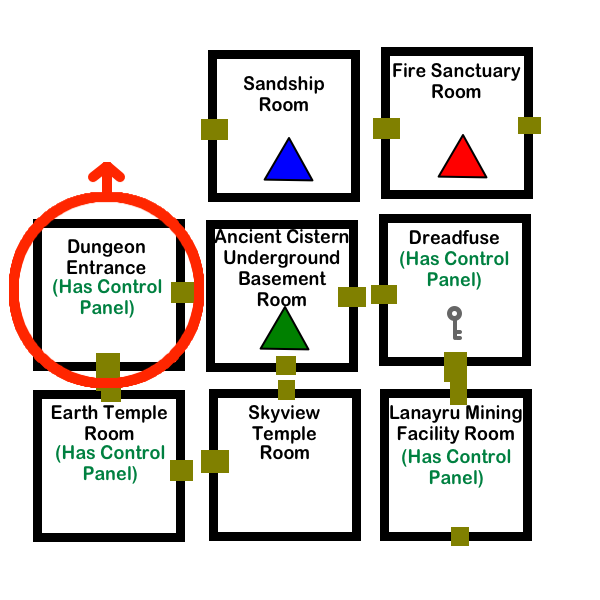
Go through where the bars were, then pull down the red bar and get the orb. Go west and step on the red switch, and throw the orb onto the conveyor belt. Kill the Beamos. You need to shoot the five wall targets next to the conveyor belt. If the orb goes past a target before you can hit it, just use the whip on the lever in the middle to change the direction of the conveyor belt. After you have shot the five targets, you gain access to a sliding tile puzzle tablet in the corner of this room. Rearrange the rooms with the control panel as shown below.

Earth Temple Room
After rearranging the tiles as shown above, go south through the conveyor belt room and pull down the red bar on the wall, then go south through the door across from the Bird Statue to return to the Skyview Temple room. Then go southwest (pulling down the red bar to remove the bars in the way if you didn't do so earlier) and go through the exit there to reach the Earth Temple room.
Go southwest under the red arch and kill the Red Chuchus that appear, then crawl into the small gap in the left wall. Turn left to go east to a room that contains a Bomb Flower. From this room, roll a bomb into the passage that you just crawled through. Afterward, crawl straight through the passage to reach the area to the west.
Kill the large Red Chuchu, then burrow into the hole in this room. Hit the red switch to move the gate out of the way. Go back to the spot of light that you started at, and emerge there. Crawl into the tunnel in the wall, then turn left and go out.
Turn left, kill the Lizalfos, then throw a bomb into the statue's basket to knock it down, but don't hit the switch behind it yet. If you do, the only way to reset it is to hit the other two switches, as explained below.
Stand on the round platform across from the statue that you knocked down, and roll a bomb down the ramp to knock down another statue.
Slide down this ramp to go into the area that the statue was blocking. Hit this switch. Climb up the vines in here, then shoot an arrow at the bomb inside of the circle of trees. After a new bomb grows there, use the Beetle to grab it and drop it into the statue to the left that is blocked by trees.
Now you have to activate the three switches in order from lowest to highest. If you have activated any already, and if you did so in the wrong order, just activate any remaining ones to reset them. To save arrows, you can use the Beetle to hit the switches, but you will have to send it in a wide arc to reach the one at the bottom of the ramp. The correct order to hit the switches is: the one at the bottom of the ramp, then the one that was near the Lizalfos, then the one that was behind the trees.
After you do it correctly, go down the ledges to the right and jump across to the area where you fought the Lizalfos. Go past where the bars were and dig into the burrowing hole. To bomb the rocks on the right, hit the bomb twice. Then when a new bomb grows (if it is not appearing, get farther away), hit the bomb to the left, then hold the A button to run to the space below it and hit it up to the rock above. Go to the upper-left corner, then go to the upper-right, where you can switch the gate. Then go to the beam of light that you can reach, and emerge there.
Follow the path, go through the red arch, and into the area ahead with the skulls on the floor. Dig into the burrowing hole here. There are two Moldorms, but the one on the right is blocked by rocks, so don't break the rocks, and kill the Moldorm on the left first, then break the rocks to kill the Moldorm on the right. Then crawl out at the upper-right corner. Pull down the red bar to give yourself a shortcut, then exit through the north door.
Dreadfuse
In the next room, you will fight a mini-boss, Dreadfuse. He is similar to Scervo.
Forward thrusts are the most effective attack in this battle, because these will avoid hitting Dreadfuse's electrified sword and electrified hook. Be sure to attack as often as you can, to push Dreadfuse back quickly. Keep an eye on his movements so you can be prepared for when he is about to attack, and do a Shield Bash to deflect it, or a backflip to avoid it. He may attack multiple times, to be prepared to do multiple Shield Bashes or backflips as needed. Then resume the forward thrust attacks as soon as his attacks stop. If Dreadfuse gets too far away for your sword to reach, run close to him before continuing your attacks.
The first time you hit him to the edge, he will lose one of his swords, but he'll pull out a second one.
His counterattacks are worse after he starts using the second sword. Just keep pushing him back until he reaches the edge. His arm will explode, leaving him with only the hook.
He can electrify the hook, so be sure not to hit it with your sword. Just keep hitting him back and do Shield Bashes to deflect his counterattacks or backflips to dodge them. After you knock him to the edge the third time, he will fall and die.
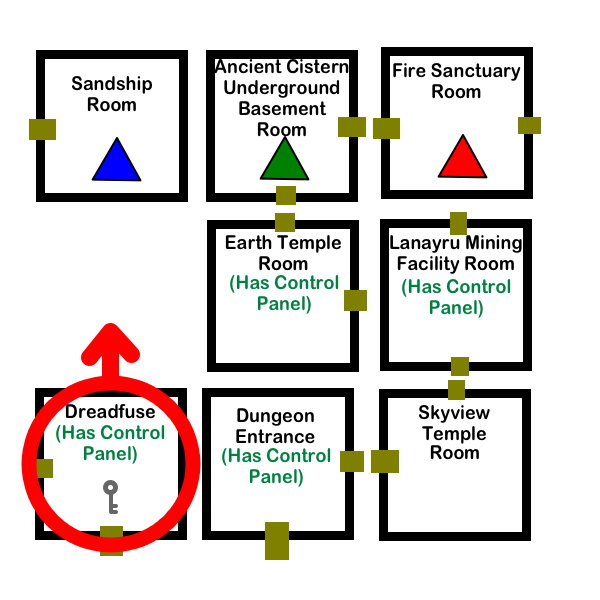
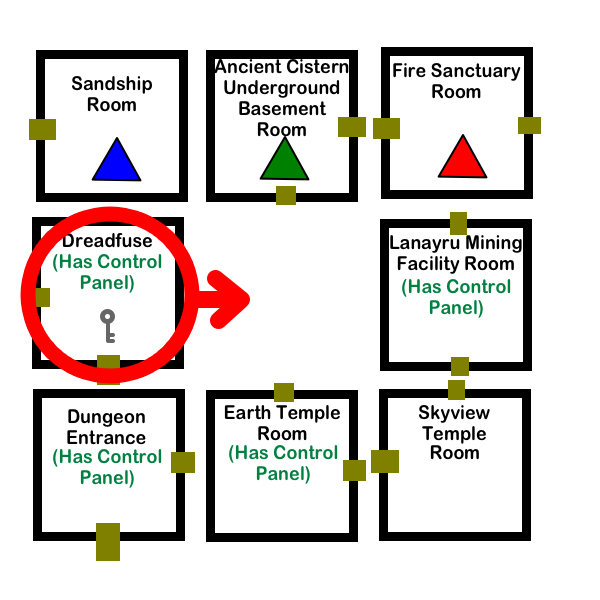
Afterward, use the Clawshots on the target on the far wall, then open the chest to the right to receive the key.
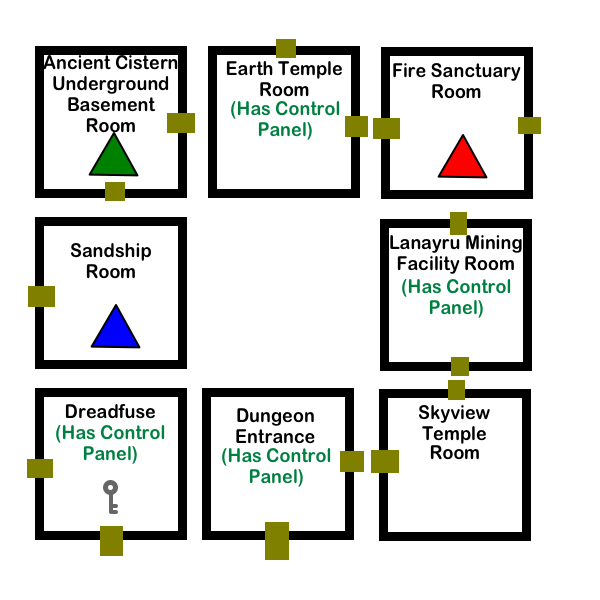
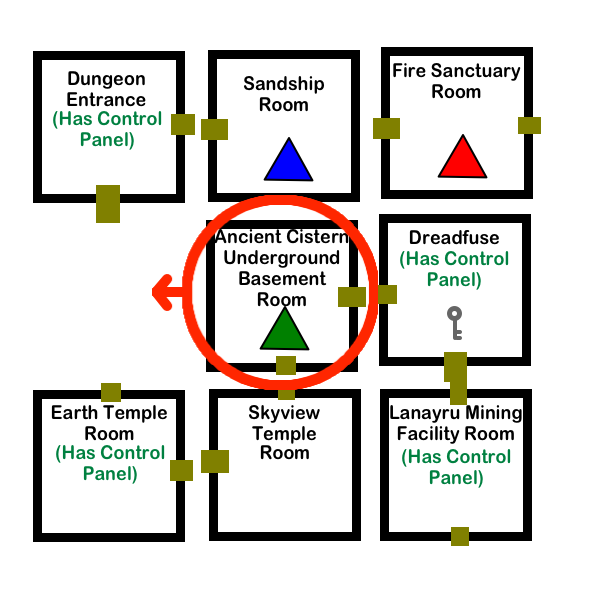
There is a door in the wall across from the chest. Go through to find a sliding tile puzzle control panel. Rearrange the rooms as shown below.
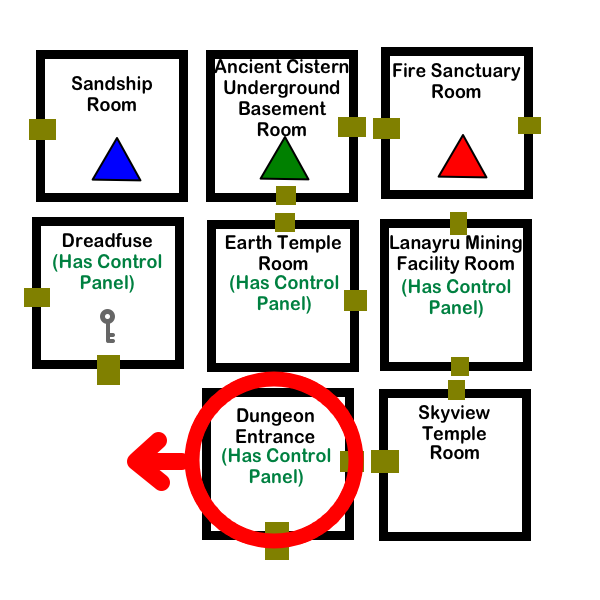
Now go through the west exit to reach the dungeon entrance room, and from there, use the south exit to reach the Earth Temple room.
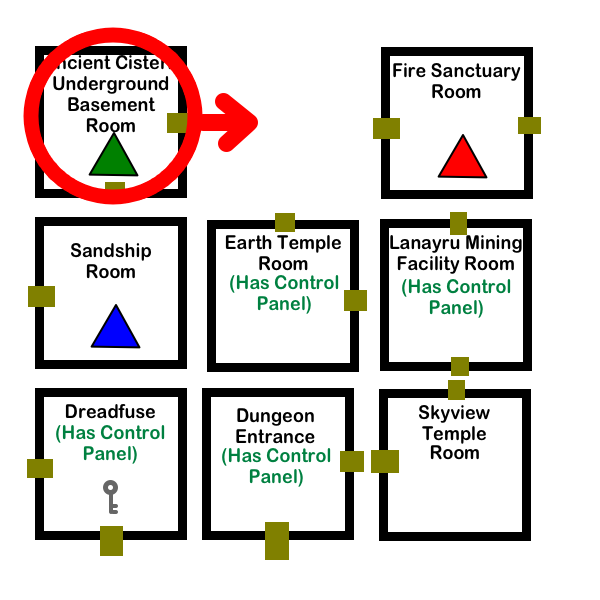
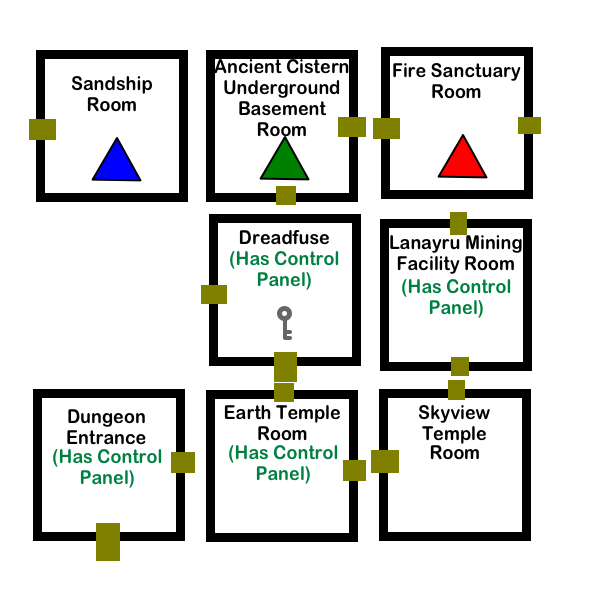
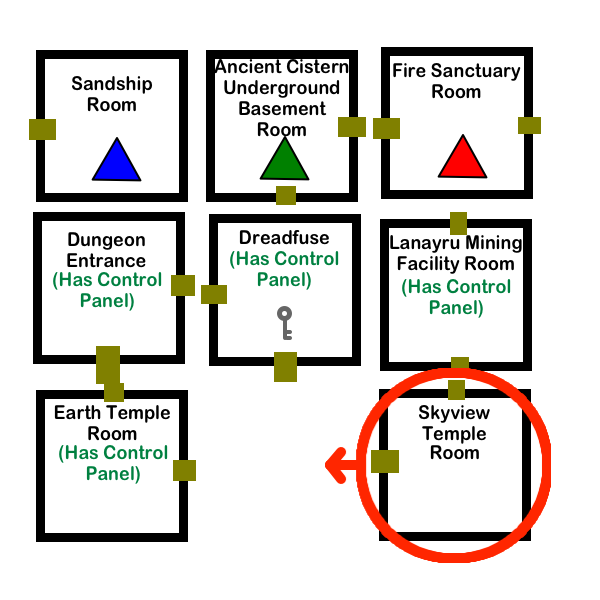
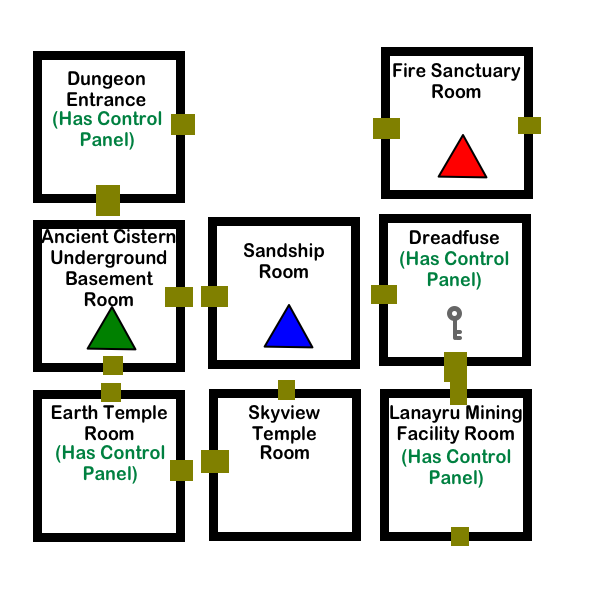
From the Earth Temple room, rearrange the rooms as shown below.

Go through the east exit to reach the Skyview Temple room, then from there, use the north exit to reach the Ancient Cistern Underground Basement room.
Ancient Cistern Underground Basement
Go along the straightforward path to reach a locked door. You should now have a key after defeating Dreadfuse, so go through the locked door. Up ahead, there are Iron Shield Moblins. You have to kill them to proceed, so run up their shields as soon as you can, to get behind them, then hit them repeatedly until they die. Make sure not to be too close to them when they start to fall forward, or you will get knocked to the ground. An alternate, but risky, strategy is to try to make them fall off by hanging off of the side of the narrow walkway, but it might not work.
After you kill the Iron Shield Moblins, the door to the next area will open. Go through. There are many Bokoblins, and two Stalfos, in this area. Try using your bow to kill the Bokoblins before you deal with the Stalfos.
After that, the next door will open. Approach the middle of the room, and the Stalmaster will get up, and Cursed Bokoblins will appear around the room. Try to kill the Cursed Bokoblins first. Remember that they won't die unless you hit them with a fatal blow. Then kill the four-armed Stalmaster. It will start out using only two swords, then after a while it will start blocking with three swords and an axe. Be sure to Shield Bash quickly if it is preparing an attack, or backflip/run out of the way.
In the next room, stand on the mark on the floor and follow the on screen instructions to reach a special room where you will find the Triforce of Courage.
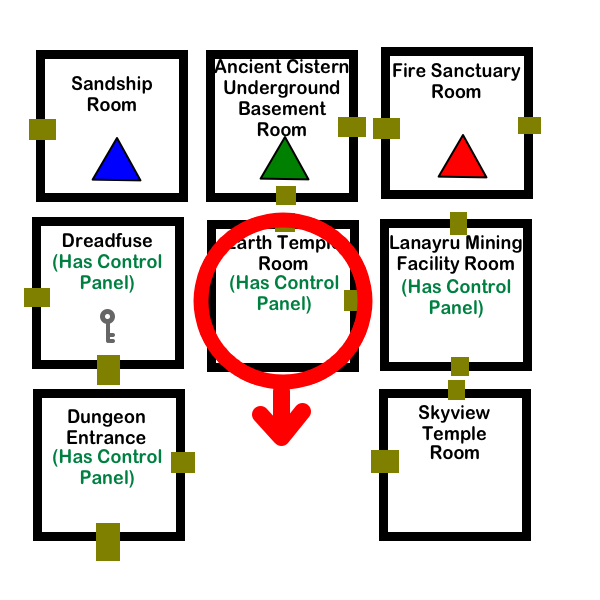
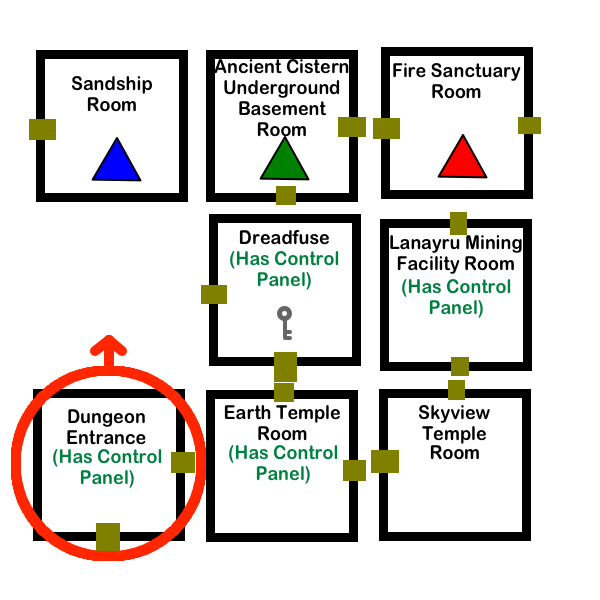
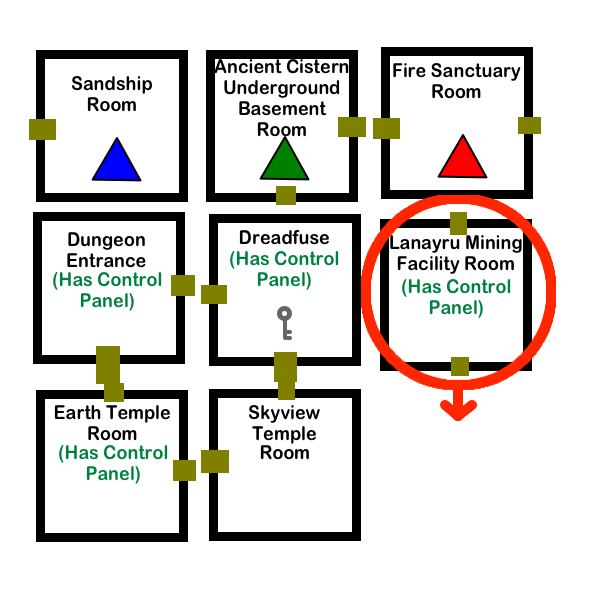
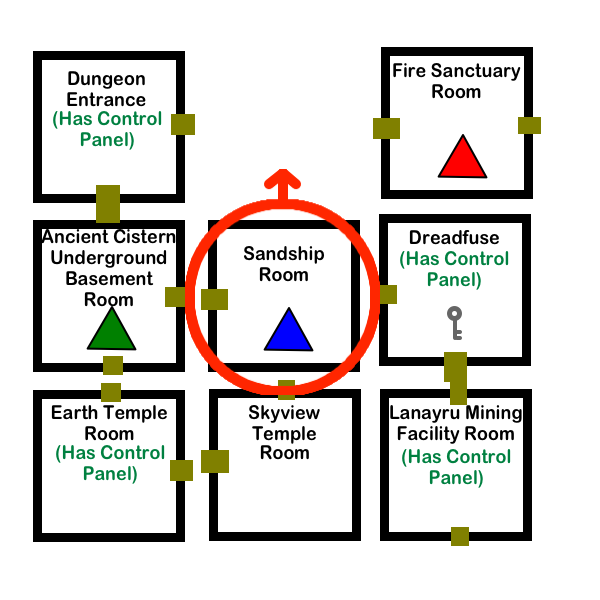
Back in the Ancient Cistern room, pull down the red bar to create a shortcut. Then go through the south exit to reach the Skyview Temple room, then the west exit to return to the Earth Temple Room. Use the control panel there to rearrange the rooms as follows.
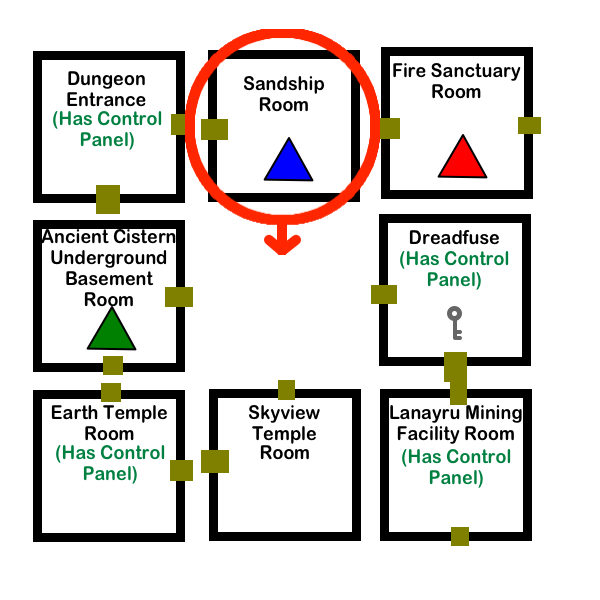
Then go through the north exit to reach the Ancient Cistern Underground Basement Room, then the east exit to reach the Sandship Room.
Sandship Room
Use an arrow or bomb to kill the Electro Spume, then run south across the sinksand to go up the ramp and get the Timeshift Orb. Take it to the middle of the room and set it down, and kill the Sentrobe that appears.
Next, take the Timeshift Orb close to the spiked barrier on the north wall, set the orb down on the orange mark on the floor there, then run across the sinksand to the middle platform, then run across the sinksand to the platform with the Bird Statue, and finally run across the sinksand to go back up the where you got the orb. Shoot the target in the north wall that was behind the spiked barrier.
Go back and get the orb and go northwest through the bars that were lowered. Kill the Babas along the path, then put the orb in the middle of this hallway to prevent the wall from rising on the east side of the hallway, and run east to where there is a red switch. Step on the red switch to open the path to the target, then shoot it through the inactive fan.
After that, take the orb toward the east wall and kill the two Technoblins in the area. Then put the orb down on the ground near where you can see a Clawshot target through the cage above. Place the orb such that a platform rises in the southeast part of the room, but also make sure that the distortion field is covering the wall between the two caged areas, so that the spiked barrier between the two caged areas is removed.
After you have put the orb in a good spot, run up the ramp, jump onto the platform, then use the Clawshots to reach the cage. Step on the mark on the floor and follow the on-screen instructions to reach the area that contains the Triforce of Wisdom.
Afterward, drop down toward the center platform of the room and run to it, then run to the platform with the door. Go through.
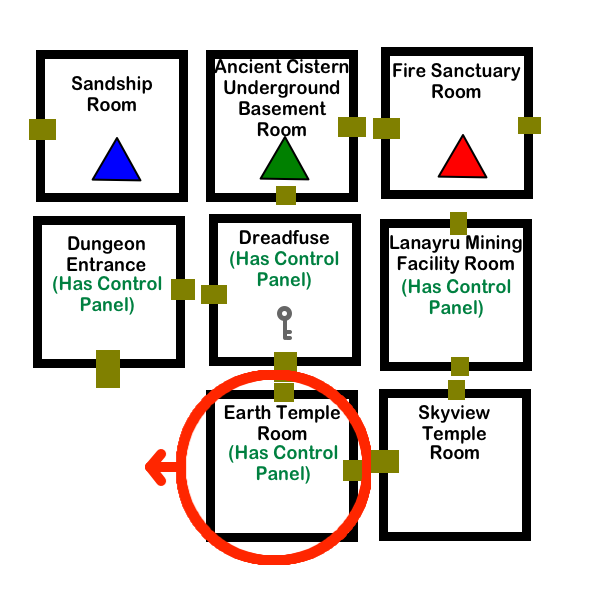
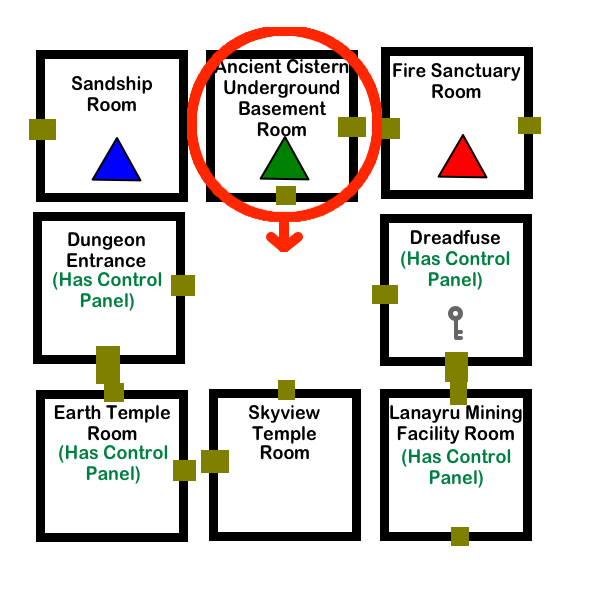
You will be back in the Ancient Cistern room. Use the south exit to return to the Earth Temple room, and go to the control panel. Rearrange the rooms as follows.
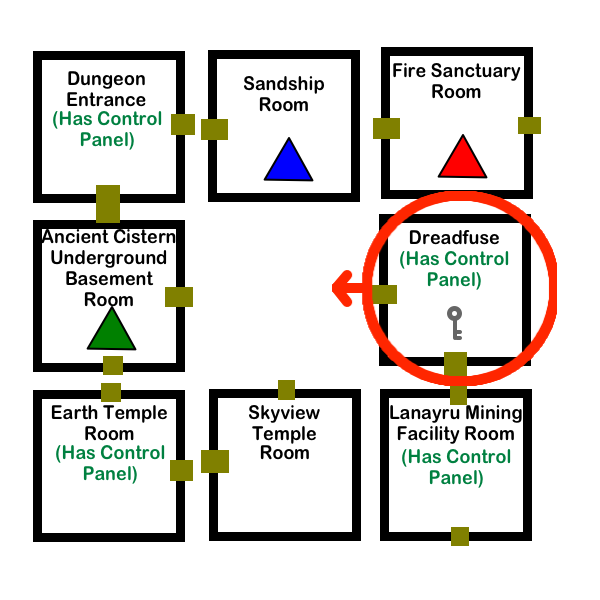
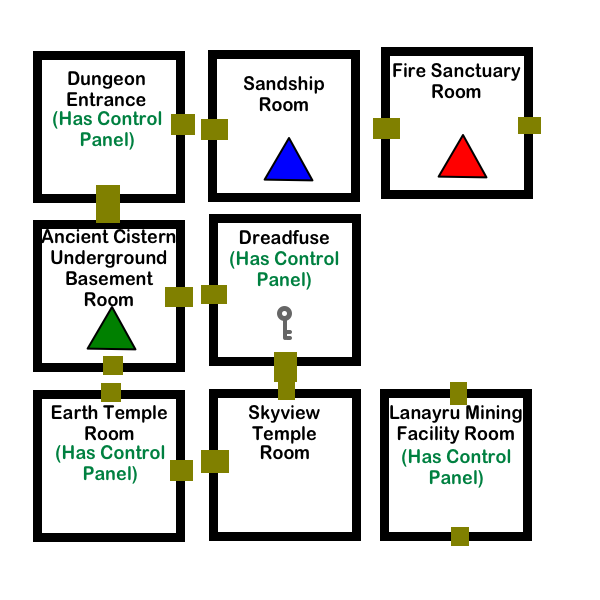
Then go through the north exit to go back to the Ancient Cistern room, then go through the east exit to return to the Dreadfuse room. Use the control panel there to rotate all the rooms counterclockwise until the red Triforce room is west of the Dreadfuse room. Use the west exit to enter the red Triforce room.
Fire Sanctuary Room
Go south and knock down the Water Fruit with the Beetle. Hop onto the floating platform. Kill the Fire Keese that attack, then use an arrow to activate the pink switch up above.
As you get close to the short bars on the right, knock down the Water Fruit. Wait until you're close enough, then run toward the second floating platform to jump over the bars and land on it.
Turn to look down the passageway and you will see a second lava flow with a pink switch on the top. Turn off that lava by shooting the pink switch. Jump off at the end and pull down the red bar to give yourself a shortcut to the entrance and Bird Statue.
Knock down the next Water Fruit and hop on. Kill the Dark Keese, then quickly shoot the pink switch to the right and knock down another Water Fruit. Jump onto the platform that appears. Jump onto the rising platform at the end. Use the Beetle to get the Silver Rupee in the nearby archway, then use the Beetle to hit the pink switch above the lava spout around the corner where you came from. This makes the flow of lava switch to the other side. Knock down the Water Fruit up ahead, and when the rising platform lifts you up, jump onto the platform that appears.
Jump onto the grating up ahead to avoid getting pushed off of the platform. Use bombs or arrows to kill the Cursed Spumes in the way. Use the Clawshot at the end to reach a ledge. Stand on the mark on the floor and follow the on screen instructions to reach the area where you receive the Triforce of Power.
Go to the Past
After you obtain the third piece of the Triforce, a long cutscene will take place. Afterward, you may want to go outside and use a Bird Statue to return to Skyloft if you are low on any supplies or if you want to change what is in your Adventuring Pouch, because once you go through the Gate of Time, you won't be able to save or return to Skyloft for a while. When you are ready, go through the Gate of Time to return to the past.