
After receiving the Sacred Flame from the Ancient Cistern, your next task is to visit the Isle of Songs. From there, you should go to Lanayru Desert.
Learn Nayru's Wisdom
Fly to the Isle of Songs in the thunderhead. Crawl into the tower and use a Skyward Strike on the crest to learn a new song called Nayru's Wisdom. Fi will tell you that the next trial is in Lanayru Desert.
Nayru's Silent Realm
When you dive down into Lanayru Desert, choose the North Desert Bird Statue. The gate to the Silent Realm is near the building with the electricity dial in the north part of this area. Use dowsing if you are having trouble finding it. Go to the butterflies near the sparkle and strum your harp, then play along with the pulsing circle of light to reveal the portal. Follow the on screen instructions to thrust your sword into it.
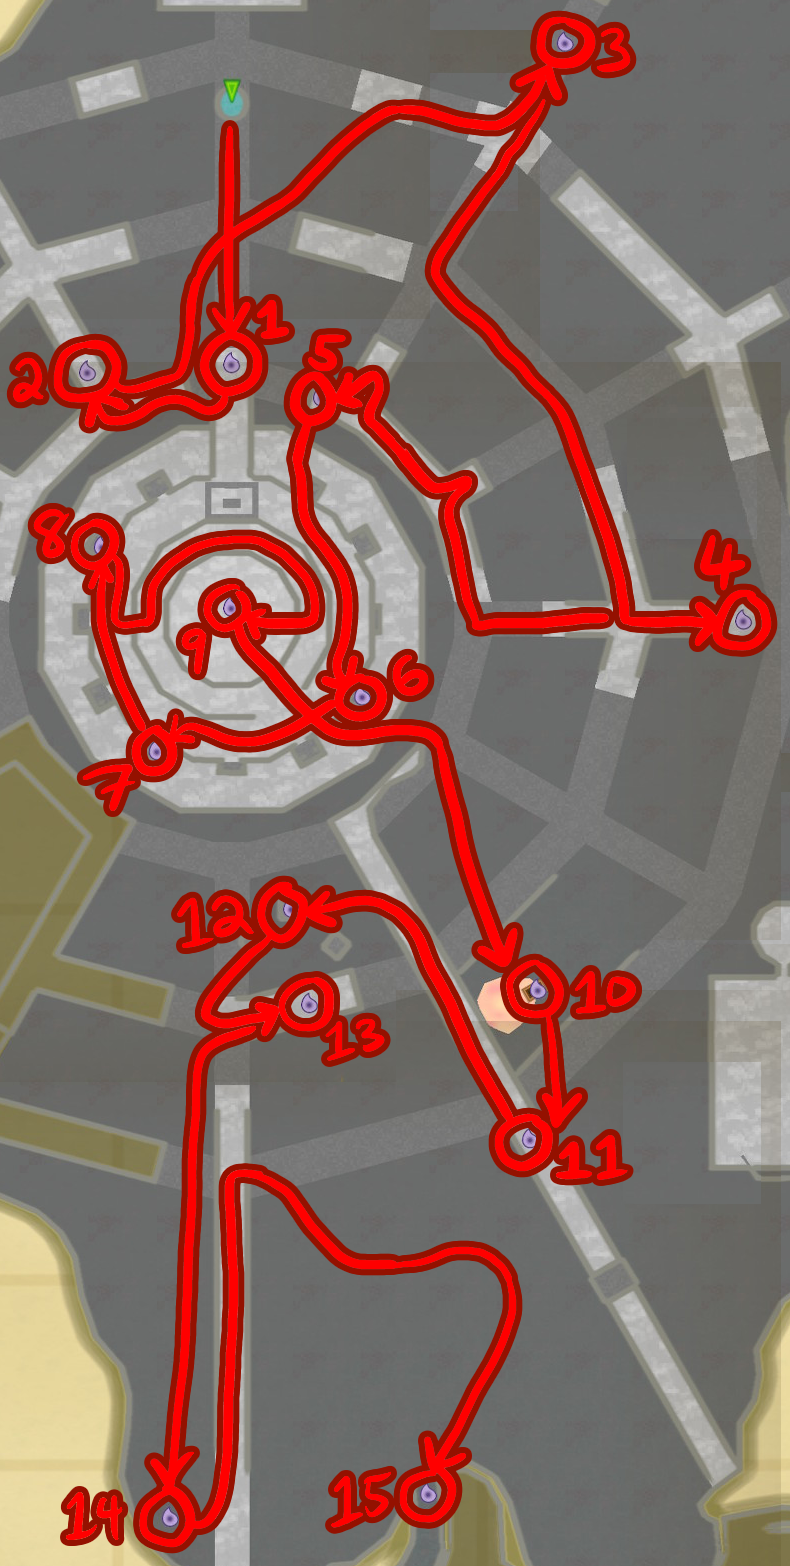
Once you are in Nayru's Silent Realm, you may notice that there is a guardian between you and the nearest tear. Leave the protective circle and run past it to the steps leading up to the Mining Facility to get Tear #1.
From the stairs, Run onto the ledge that has the generator on it, where you turned the three dials. Tear #2 is in front of the generator.
Jump back to the stairs and go north, in the direction of the protective circle at the entrance. Go northeast and get Tear #3.
Go southwest along the submerged wall until you can go southeast on the central submerged wall. You may wish to use beacons to make sure you are walking along the submerged wall so you don't sink into the sinksand. When you are back on solid ground, go up the ramp to the top of the wall, where you can get a Dusk Relic and Tear #4.
Go west along this wall and go down the slope, then go up the slope to the right. Be careful of the Watchers up here. They go back and forth. Follow behind the first one, making sure not to let the Watcher's light shine on you, and then hide out on the spot on the right. Watch the movements of the Watcher on the right, then emerge from your hiding place and run to the ledge with the Guardian on it when both Watchers are safely out of your way. Then collect Tear #5 when the Watcher here is not shining its light on it.
Make sure you are not out of stamina and jump down toward the tower, and run up the wall to reach the base of the tower. Go clockwise around the base of the tower and get Tear #6 from the boxes leading up to the upper level. Stay at the level at the top of the boxes and continue going clockwise to get Tear #7 and Tear #8 from the surrounding boxes as well.
Still on the tower, go to the nearby vines on the the southwest of the tower and climb up. Then clockwise around the tower to find vines on the east wall of the tower. Climb to the top of the tower to find Tear #9.
Now go southeast from the tower, in the direction of the building where you activated the fire dial. You will see a tear hovering in the air with a mine cart nearby and some Waking Water rising and falling around the mine cart. Pull (don't push) the mine cart toward the tear when the water goes down, and if the water rises too much, back away to allow the water to recede again. Climb onto the cart from the side and get Tear #10.
To the south, there is a mine cart up against the wall. Run up it to get Tear #11.
Go northwest along the wall. Near the cages, there is a mine cart that you can push against a cage to run up and reach Tear #12.
Look south and you will see a tear on the wall. Go to the slope on the west side of the wall and run up it to get Tear #13.
Look to the south and you will see two tears in the distance. There are also many Watchers in the area. Go to the west side of the southern wall so that the wall is between you and the Watchers. Go south to the tree, and do a roll attack into the tree to knock down Tear #14.
Don't go directly east to the final tear. The Watchers are too close together and will start chasing you. Instead, go north until you can go southeast into a gap between the Watchers. Follow the trail of Light Fruits and Stamina Fruits, which takes you on a safe path to Tear #15.
Now that you have all 15 Tears of Nayru, the timer will no longer count down. You are free to explore this area at your leisure and look for Dusk Relics, but be careful to stay away from Watchers and Waking Water.
Receive the Clawshots
When you return to the exit of Nayru's Silent Realm, you will receive the Clawshots. You can use them to pull yourself to targets and vines. In addition, if you are hanging from a target or some vines, you can use use the other Clawshot to target something else.
Find Goddess Cubes and Treasure
Back in Lanayru Desert, go around and look for wall targets. You can now access Goddess Cubes and a blue chest containing a Dusk Relic.
The Dusk Relic is in a blue chest close to where you entered Nayru's Silent Realm. Use the Clawshot to hit the target and climb up onto this ledge.
One Goddess Cube can be reached by bombing the wall east of where you turned on the electricity dial, if you didn't bomb it already. Go to the end of the cave, and if you didn't get it earlier, there will be a chest here that contains a Piece of Heart. From there, use the Clawshots to make your way along the path. Then you will reach a ledge with a Goddess Cube on it. It unlocks a chest on an island between Bamboo Island and Beedle's Island. The chest contains a Heart Medal.
The other Goddess Cube is on a wall southwest of the tower. You can get up onto the wall using a Clawshot target near the southern side of the tower. This unlocks a chest on an island northwest of Fun Fun Island. Land on the eastern side of the island and climb down the vines to reach the chest. It contains a Life Medal, which gives you an extra Heart Container if you have it in your Adventure Pouch.
Piece of Heart and Gratitude Crystals
Go to Skyloft and sleep in a bed until night. Go to eastern Skyloft and jump over the rocks in the lake. Approach the entrance of the Waterfall Cave and use the Clawshots on the vines on the floating island above. Then use the Clawshots again to reach the larger floating island up above. You will find a Gratitude Crystal at the top of the waterfall.
Also at night, go onto the roof of the Knight Academy by running up the wall with the narrow wooden ledge next to the second floor entrance, and going across with your hands, then jump over the awnings to reach the ivy at the end. Climb up onto the roof, then use the Clawshots on the target in the chimney. Crawl through the crawlspace and you will fall into Zelda's room. There will be a Gratitude Crystal here (if not, sleep in Zelda's bed until night), and you can open the cupboard to get a Piece of Heart. You can also sit in her chair to read her journal...
Find Bertie's Baby's Rattle
Now that you have the Clawshots, you can go to Skyloft and talk to Bertie at the Potion Shop in the Bazaar, and he will say that he can't sleep. Sleep until night, then go to Bertie's house in the eastern part of Skyloft, and he will mention that his baby's rattle was lost.
It ended up in the nest on top of the wooden windmill. To get there, go to the eastern side of Skyloft and use the Clawshots to reach the vines on the floating island near the entrance to Waterfall Cave. From there, look up and use the Clawshots on the vines of the big floating island. Climb up there and go around to the southern edge of the pool. You can strum the harp near the butterflies to make a Gossip Stone appear. Talk to it and it will give you a clue about reaching the nest.
Make a running jump off of the edge and skydive to the nest. Don't lean forward too much or you will dive too quickly to reach the nest. Then use the Gust Bellows to blow the dust off of the rattle, and take it. Then sleep until night if it isn't night already, and take the rattle to Bertie. You will get five Gratitude Crystals.
Help Fledge Again
Now that you have completed the Ancient Cistern, Fledge has made enough progress in his training that you can give him another Stamina Potion. Buy one from the Skyloft Bazaar, then sleep in a bed on Skyloft until night, then talk to Fledge in his room in the Knight Academy to give him the potion.
Reach the New Area
There is an area in western Lanayru Desert that is now accessible with the Clawshots. It is near the West Desert Bird Statue. If you didn't push the mine cart down from the wall near this statue, stand back from the wall and use the Clawshots to get up onto the ledge, then push the mine cart down to give yourself a shortcut. On the ledge, go toward the falling sand and hop along the rocks near the cave opening up above. Use the Clawshots to go up, and go inside.
Lanayru Caves
In here, you will meet Golo, who is digging at the wall. (In case you have heard of the game-breaking glitch with Golo in the Wii and Wii U versions of the game: this is not where it occurs.) Talk to him to receive a key to the door in here. If you sit in the chair near Golo, he will ask you to invest 10 rupees in his excavation. Since it is such a small amount, it is recommended to give him the rupees.
The nearby blue chest contains a Monster Horn. Fi will tell you that you can use the Whip to take away the horns that Bokoblins can use to summon more monsters.
You can also strum the harp near the butterflies in the middle of the circle of bombs to reveal a Gossip Stone.
Use the Clawshots to reach the locked door and go through to reach the Lanayru Sand Sea.