
After activating the Light Tower, you can fly into the thunderhead.
Find Dodoh's Party Wheel
Before proceeding to the Thunderhead, there is something new that you can unlock. Fly to Fun Fun Island in the southwest to learn that Dodoh has lost his Party Wheel. Fi will add it as a dowsing target. It is in Lanayru Desert, close to the Desert Entrance destination. Activate the crystal near the Bird Statue, then climb up the vines, and look for the narrow ledge against the wall that you can go across with your hands. From there, go down the ramp to find the Party Wheel. Go back to the sky and fly to Fun Fun Island to give Dodoh the party wheel. You get five Gratitude Crystals.
Dodoh's High Dive game is a skydiving game. Your first play is free. Walk onto the cannon in the middle to start. While falling, follow the on screen instructions to move around. Don't fall through the purple orbs. Fall through the rings. Then try to land on a good spot on the spinning circle (don't land on the stationary area in the middle). If you fall through all of the rings and land on the multicolored spot, you will get a Piece of Heart.
Go Into the Thunderhead
Fly to the place in the clouds that the beam of light is shining on. You will reach the inside of the Thunderhead.
There are monsters flying around, so be careful here. Check for unlocked Goddess Cube chests in this area. There should be one on the large northern island, at the base of the tower. It contains a Gold Rupee, worth 300 rupees. The other islands here don't have much of anything on them, although there is one that has a chest that contains a random rare treasure, which you can reach it by digging in the soil below it.
There are some large islands to the north. Land on the one that has circular rings. There will be a brief cutscene.
Your goal is to line up the three pieces of the bridge. They are represented by three small platforms on the island that you landed on. There is an object in the center of the island that rotates these platforms when you push on the flat side of it. There are also walls that you can raise and lower by hitting the crystals in the square object. You will need to swing your sword in the correct direction to hit the different crystals. If a wall is in the path of a platform, then that platform will not move when the others do.
Make one of the platform pieces get stuck on a wall, then rotate the others until one of them is lined up with the one that is stuck. Then hit a crystal to make the wall go down. Rotate the two lined up platforms, hitting the crystals to keep the walls out of their way so that they stay lined up. By doing this, you will eventually make the third one line up with them as well. Once they are lined up, rotate them, removing any walls in the way, until the bridge is pointing to the tower.
Cross the bridge and crawl into the hole. Go to the end of the platform and use a Skyward Strike on the crest. During a cutscene, you will learn a new song and gain the ability to dowse for your destination. It is in the Faron Woods.
Enter Farore's Silent Realm
Go down to the Viewing Platform in Faron Woods. Then dowse to find the entrance to your trial. It's in front of the Viewing Platform at a sparkling area surrounded by butterflies. Play your harp here, then strum in time with the pulsing circle.
Stand on the symbol that appears and follow the on screen instructions to thrust the sword in and enter Farore's Silent Realm.
About the Realm
While in Farore's Silent Realm, you can't use your sword or any items.
Your task is to collect all 15 of the Tears of Farore. (See below for the route to collect the tears.) However, once you step outside of the protective circle, the Guardians in the area will be alerted to your presence and will come after you. If they hit you even once, you will fail the trial and have to try again.
However, each time you collect a Tear of Farore, you will be safe for 90 seconds. You can see how much time is left by looking at the flower in the top left corner of the screen. Keep an eye on this timer to reassure yourself that you have enough time. Once all of the petals fall off, the guardians will start coming after you again, until you collect another tear or go back into the protective circle of the entrance. (If you want to leave without finishing the trial, go back into the protective circle to make the exit appear.)
After you collect a tear, its location will be marked on the map even if you fail and have to restart the trial.
There are Watchers floating around, and if they get close to you and shine their light on you, the flower will instantly wilt and the Guardians will come after you immediately, even if you just got a tear. Watchers will start to follow you if you get too close to their light, even if you are not within the beam of light, so beware.
Similarly, if you step into Waking Water (which Fi will mention the first time you see it) the flower on the screen will also wilt right away and the Guardians will come after you immediately.
There are small white Light Fruits around the area. If you collect one, the tears will send up green beacons that make it easier to find the next one.
This is the only place so far where you can find Dusk Relics, so be sure to collect those if you see any.
Find the Tears of Farore
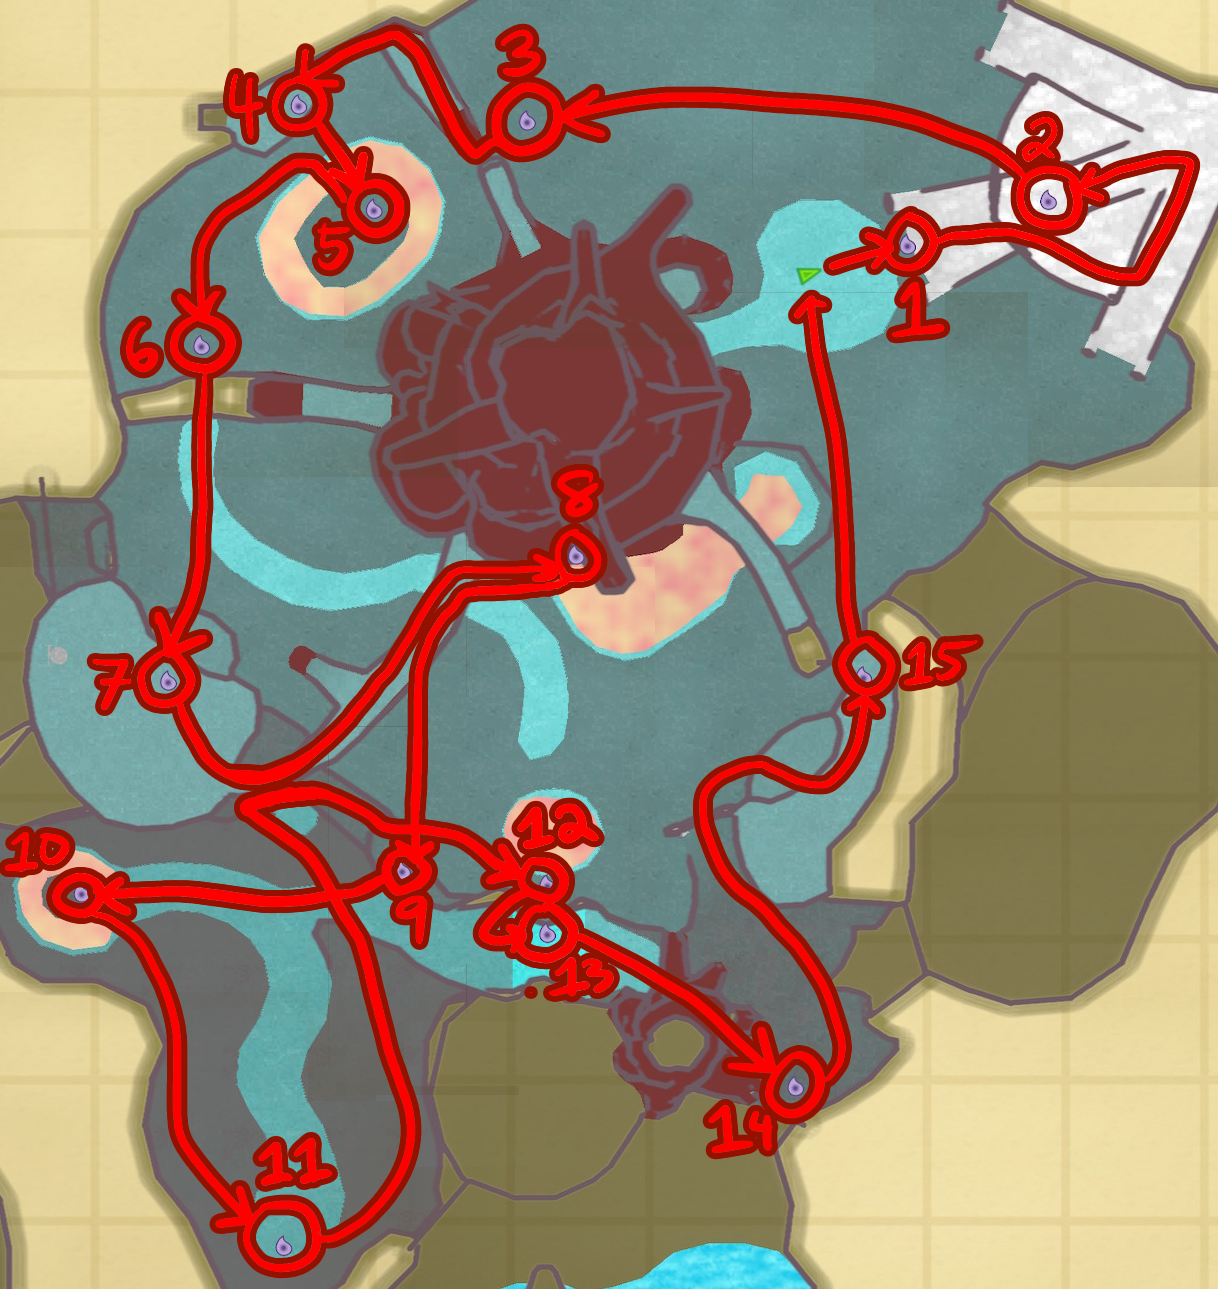
Start by getting Tear #1 that is straight ahead of you, at the base of the steps leading up to to the Viewing Platform. This will give you plenty of time to get Tear #2 on the top of the Viewing Platform.
From the platform, go west. Avoid the Watcher to get Tear #3 just before a slope leading to some vines.
After getting that tear, walk northwest up the slope and climb the vines on the wall to reach the ledge above, where you will find Tear #4.
Carefully hop down. Climb over the log to reach Tear #5 inside of the circle of Waking Water. If you step in the Waking Water by accident, just run to the tear, to start the safety timer again.
Go back across the log and go toward the gap near where a Guardian is standing. You will find Tear #6 here.
Crawl through the gap, go south, and climb up the ledges to get Tear #7.
There is a narrow path connected to this ledge. Walk straight across to reach a rope leading to another tear. Walk across the rope (making sure to stay balanced) to collect Tear #8 at the end.
To avoid falling into the Waking Water below, walk back across the rope. Then hop down, go south, and drop down onto a ledge to get Tear #9 here.
Hop down again and go west. There is a tear straight ahead within a ring of Waking Water that rises and falls. Wait for the Waking Water to recede completely, then run in and get Tear #10 and run back out again. Try to run out immediately so you don't have to wait for the water to rise and fall again.
Go southeast, staying near the wall to avoid the Watchers, to get Tear #11.
Go north while staying near the east wall, then go northwest when you are far enough away from the Watcher, and climb up the ledge. Go east up two more ledges, then at the top, get Tear #12 from in front of the Guardian.
Go southwest to drop down to the base of the slope, then run up the slope to get Tear #13.
Go southeast under the tree. Avoid the Watcher and get Tear #14.
There is only one left now. Go northwest while avoiding the Watcher, and walk through the stone archway, then go east and climb up the ledges to get Tear #15. Then push the log down from the ledge to give yourself a shortcut back to the exit of the realm to the north. The entrance will show a beacon after you get all 15 tears, which makes it easier for you to find your way back.
The timer will not decrease after you collect all of the tears, so as long as you stay away from Watchers and Waking Water, you can explore the area at your leisure and collect any Dusk Relics that you can find.
Get the Water Dragon's Scale
When you have gathered all 15 tears and are ready to leave, enter the protective circle. You will receive the Water Dragon's Scale, which allows you to swim underwater.