
After you gain a new ability in Burenia, you return to Dairon to destroy the yellow E.M.M.I., also known as E.M.M.I.-04SB.
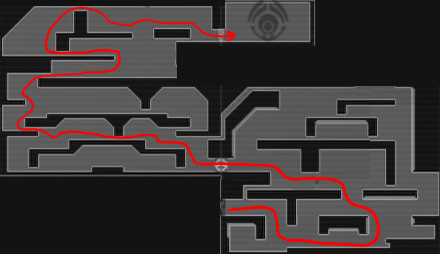
Reach the Dairon Central Unit
After the shuttle from Burenia arrives in Dairon, go to the right and go through the door. Make your way to the right side of the room and you find an E.M.M.I. Zone Door. When you are ready, go through.
Go through the water on the right until there is a blue wall that you can climb up. From there, go to the left and run through the shutter. The pressure plate will cause the gate to close behind you, delaying the E.M.M.I. if it is following you. Then shoot a charged shot at the door on the left and go through.
Jump up onto the ledge on the left, then go left and slide through the gap. Keep going left and when you see a tunnel above you, roll through it. Jump upward from there, and there will be a tunnel above you that you can jump up to and roll through. From there, go to the right until you can jump up onto the ledge to the left. Go left from there and slide through the gap, then jump up the ledge on the right and roll through the tunnel at the top. Go to the right and jump over the gap, then go through the door to reach the Central Unit.
Dairon Central Unit
While you shoot missiles or charged shots at this Central Unit, three wall turrets will be shooting rings at you, and one will be shooting laser beams. Dodge these and keep shooting the Central Unit until it is destroyed and you receive the Omega Cannon.
E.M.M.I.-04SB (Yellow E.M.M.I.)
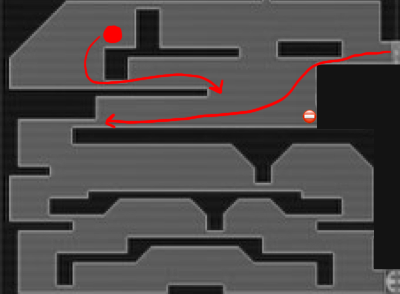
Go to the left, but make sure that you don't end up in the dead end beneath the door of the Central Unit's room. Go to the lower left. This E.M.M.I. moves very quickly, so don't count on having enough time to destroy its heat shield from here. It will slow down when you are hitting its heat shield, but if your aim is off, the E.M.M.I. can quickly close the distance, so be prepared to run.
Slide through the tunnel on the left, then go to the right, where there is another tunnel. Turn around, and either hold L and Y to destroy the heat shield if you haven't already, or hold L and R to charge up the Omega Cannon, then press Y when the cannon is fully charged.
Once the heat shield is destroyed, the E.M.M.I. move more slowly.
Slide through the tunnel on the right. Keep an eye on the E.M.M.I. in case it changes direction, but otherwise, from the tunnel you just slid through, go to the right and down, then slide through the tunnel on the left. Then go left and jump to the tunnel above, and roll through it, then get onto the ledge on the right and keep going right. When the tunnel is on the right again, turn around and hold L and Y until it the heat shield is destroyed, or if you already destroyed it, hold L and R, then aim at the E.M.M.I.'s head and press Y when the cannon is fully charged.
About Speed Booster
After you defeat the E.M.M.I., you gain the Speed Booster ability. To use it, push the left control stick like a button while moving. You only need to push it once, and the Speed Boost will remain active until you stop moving or change direction. You can destroy Speed Booster Blocks by touching them while your Speed Boost is active. To destroy a group of Speed Booster Blocks, you only need to touch one of them while Speed Boosting. This will destroy the entire group of adjacent blocks.
You can also use the Speed Booster to perform Shinespark. When you are going at maximum speed during a Speed Boost, tilt the left control stick down, and you will temporarily turn purple. If you press B before you turn back to normal color, and tilt the left control stick in the direction that you want to go, and you will launch yourself in that direction. You will continue going in that direction until you hit a wall. This will also break any Speed Booster Blocks in the way.
If you have Speed Boosted, then tilted the left control stick downward and turned purple, you can crouch or enter a tunnel to switch to Morph Ball form, then press B before you turn back to normal color and tilt the control stick to perform a Shinespark while in Morph Ball form.
Get an Energy Part
Look at the map to see the location of the Central Unit, and the nearby Energy Part. Starting from the tunnel at the left side of the room, do a Speed Boost toward the right and you will break through two walls of Speed Booster Blocks. Go back to the left to get the Energy Part.
Get a Missile+ Tank
Drop down from the tunnel where you just got the Energy Part, then Speed Boost to the right. Jump over the gap at the end while still Speed Boosting and you will break through the wall to the right, and go through the E.M.M.I. Zone Door while still Speed Boosting. If you are still Speed Boosting at this point, jump after you exit the E.M.M.I. Zone and then do a wall jump off of the rightmost wall while still Speed Boosting. When you are near the ledge on the left, slide to the left and you will slide through some Speed Boost blocks. If you don't make it, you can shoot a charged shot at the door above, and go through. If you are still Speed Boosting, you can do wall jumps off of the walls on the left to reach the upper part of the room, then when you reach the top, wall jump off of the right wall to bounce into the wall on the left that is between you and the Missile+ Tank.
It's difficult to perform this, so don't worry if you don't make it.
Get an Energy Tank
Go back down to the platform below the Missile+ Tank, then go into the tunnel on the upper left. Use a bomb to break through the blocks above you. Go upward and you find an E.M.M.I. Zone Door. Go through.
Speed boost to the right, then when you are getting close to the wall on the right, tilt down on the left control stick to ready a Shinespark. Press B, and you will Shinespark upward through several sets of Speed Booster Blocks (you Shinespark upward by default). Afterward, go downward to get the Energy Tank on the left (it is just below where you hit the ceiling).
Get a Missile Tank
Go through the door at the upper right. Jump up onto the ledge above you, then go through the tunnel on the left to reach the platform above. Go up and to the right until you see an unknown item above a blue ceiling. Start speed boosting to the right. Jump over the gap while Speed Boosting, then jump up at the end of each ledge you encounter, while still Speed Boosting. If done correctly, you will break through the Speed Booster Blocks at the upper right of the room. Don't worry if you don't make it: the E.M.M.I. Zone Exit here just leads to a dead end for now, so go back to the E.M.M.I. Zone.
Go through the bottom right door of the E.M.M.I. Zone and you will see the Wide Beam Box that you shot out of the way earlier. Go through the door on the right and you will be in a Save Room. Save if you wish, then start Speed Boosting to the right and shoot the door so you can Speed Boost through the door. When you reach the raised part of the floor, tilt downward on the left control stick to ready a Shinespark, then press B and tilt upward on the left control stick to perform a Shinespark through several sets of Speed Booster Blocks above you. Go to the left to get the Missile Tank there, then go to the left and drop down below and use the Teleportal to return to Artaria.