
After you defeat the broken E.M.M.I., you must go through the E.M.M.I. Zone that houses the white E.M.M.I., also known as E.M.M.I.-02SM.
Artaria E.M.M.I. Zone, Part 1
After you enter the E.M.M.I. Zone in Artaria, the map will display an outline of the area that you have entered. Exit the map, then go downward and slide through the gap. Go down to the platform below, then go to the left and go up. Shoot the door on the left and go through. There will be a cutscene where another E.M.M.I. appears. You will automatically slide through a gap to avoid it. This E.M.M.I. cannot crawl through gaps.
Jump onto the platform above, and shoot the red thing in the left side of the ceiling until the ceiling breaks open. Keep making your way up, then go to the right and go through the door at the end. In the next room, jump onto the first platform, then slide through the gap and go through the door on the right. Slide through the next gap and you will fall into some water. Since this E.M.M.I. can't crawl through gaps, it will give up the chase, and the door on the right will unlock. Go through. E.M.M.I.s can't go through the pixel doorways or leave the grey areas of the map, so you are safe from it now.
Get a Missile Tank
Go to the right. Ignore the door on the right: it locks when you approach it. Instead, jump up the platforms, killing the slug-like creatures as you go. Collect the Missile Tank from the top (where there is another locking door), then go to the left and kill or avoid the ceiling creature.
Reach a Network Station
Go through the door on the left to reach another Network Station. You will get another briefing, and you will be prompted to save. You can save in this room from now on.
Artaria E.M.M.I. Zone, Part 2
The upper door on the left is unlocked, so go through. Go upward and shoot the red thing in the wall near the ceiling, then jump up and shoot the next red thing to open the wall. You can't reach the Missile Tank in the gap right now, but the path to the left has opened, so slide through the gap on the left. There is an E.M.M.I. Zone Door here. You may wish to enter and exit it so you can study the partial map of the E.M.M.I. Zone. In this upcoming E.M.M.I. Zone, if the E.M.M.I. detects your movement and its scanner turns yellow, try not to panic. It can only see you if you are in range of its forward scanner, so keep your distance, and check the map to look for an escape route if it is pursuing you.
Advice for E.M.M.I. Zones
- The E.M.M.I. can't go through the pixel doorways or leave the grey areas of the map.
- Avoid physical contact with the E.M.M.I. at all costs. If you make physical contact with it, you will have to perform a melee counter at the exact moment of the flash, and if you do not succeed, you will get a Game Over.
- If you do get a Game Over, try not to get frustrated: you can just Continue and you will start at the last checkpoint, which is just outside of the last E.M.M.I. Zone Door that you used before the Game Over.
- After you enter an E.M.M.I. Zone for the first time, you may wish to immediately leave the E.M.M.I. Zone so you can study the map and plan your route. (A map of this E.M.M.I. Zone is provided below.)
- While in an E.M.M.I. Zone, the E.M.M.I. makes beeping sounds that get louder the closer the E.M.M.I. is to you. If the E.M.M.I. is nearby, it will appear as a red dot on the minimap and on the pause screen map. Always listen and look for the E.M.M.I. so you can avoid it.
- Always be aware of the locations of E.M.M.I. Zone Doors so you can be prepared to backtrack to a known exit if you are unable to avoid the E.M.M.I.
- Try not to panic if the E.M.M.I. hears you. A circle will be displayed, showing its range of hearing. Just avoid letting it see you as it comes toward you, and get out of its hearing range, or leave the E.M.M.I. Zone if necessary.
- The cone that is displayed in front of the E.M.M.I.'s head indicates its range of vision. Stay out of this cone at all costs. If the E.M.M.I. sees you, all E.M.M.I. Zone exits will be blocked. However, if you get far enough away from the E.M.M.I., it will stop following you and the exits will open again, so do your best to outrun the E.M.M.I. if it sees you.
- The E.M.M.I. can change direction while following you if doing so would give the E.M.M.I. a shorter path, so always keep an eye on the red dot on the map if the E.M.M.I. is following you, because it might no longer be coming from the direction that you expect.
When you are ready, go into the E.M.M.I. Zone and go to the left to slide down an incline. You can optionally go to the right to find an exit from the E.M.M.I. Zone, which leads to a Total Recharge Station.

Remember, if the E.M.M.I. detects your movement and its scanner turns yellow, try not to panic. It can only see you if you are in range of its forward scanner, so keep your distance, and check the map to look for an escape route if it is pursuing you.
Once you have entered the E.M.M.I. Zone, keep an eye on the map because it will show you if the E.M.M.I. is near, then go down to the T-shaped platform below, and go to the left, where you find another platform below. Land on that platform and go to the left until you see a door up above. Go through it. Slide through the gap in front of you, then go to the left, then when it is safe to do so, jump onto the platform to the right. From there, jump onto the platform on the left, and go to the left until you see a door up above. Go through it.
Go to the left side of the room and slide through the gap on the right. Ignore the red thing on the wall (the E.M.M.I. will start chasing you if you destroy it) and instead go to the left, shooting your beam to break down the walls to the left. In the next room, slide through the gap up ahead, then go through the E.M.M.I. Zone Door.
Get the Artaria Map
You will land in some water. Shoot the swarm of water creatures, and kill the ceiling creature. Go to the left and jump up onto the ledge, and kill the second ceiling creature. Go to the left and kill the wall creature, then jump up the ledges and go through the door. Save in the Save Room, then go through the door on the left.
Go to the left and make your way down. You will see an energy tank to the right, but you can't reach it right now. Slide down the slopes below that missile tank, and you will land in some water. Be aware that you can't use the Dash Melee attack underwater. You can't reach the door above and to the right, so just keep going to the right. Kill the water creatures, then go to the right.
Shoot the red thing in the wall until a hole opens in the wall, lowering the water level. You can't go farther right, so go back to the left and jump up the ledges to reach the door that you couldn't reach earlier. Go through and step on the glowing panel to download the map of Artaria. Save the game if you wish.
Get a Second Missile Tank
Go through the door on the right, then make your way up to the top of the room. Go to the left, kill the creature, and go through the door.
There will be a large creature here. Shoot it with missiles, then when it rears up on its hind legs, wait for it to flash, then do a Melee Counter to defeat it. Go through the door on the left.
This is the missile tank that you couldn't reach earlier. Take it, then go back through the door on the right, and go through the next door on the right, to reach the area above the water. Go downward, and you can optionally go through the door on the left to save the game again (check the map), then go to the bottom of the area to land in the water. Go to the right and jump up the ledge at the right and you will find another E.M.M.I. Zone Door. When you are ready, go through.
Artaria E.M.M.I. Zone, Part 3
Remember to try to hide from the E.M.M.I. at all times. If it sees you, look at the map and try to find an escape route.
From the E.M.M.I. Zone Door, slide through the gap to the right, then go to the right until you are on a ledge with a platform below it. Jump down onto that platform, then go left and down, then go downward again. When you see a narrow gap to the left, go to the right and drop down from the ledges to reach the bottom. You will land on a raft on the water.
There is a device to the left that will raise the water level (indicated by a hand icon on the map), which will raise the raft. You have to keep standing on it until the raft stops rising. Once the raft has reached the top, it gives you access to a narrow gap to the right of the raft that you can slide into. The device will be deactivated if you leave the E.M.M.I. Zone, so if you have to leave and come back, you will have to activate the device again. Your goal is to avoid the E.M.M.I. while you activate the device (stand on the glowing panel in front of the device to activate it), then prevent the E.M.M.I. from seeing you while you go to the gap to the right of the raft, and slide into that gap. Be sure to keep your distance from the E.M.M.I. while you avoid it, to reduce the chance of it detecting your vibrations.
Once you have slid through the gap to the right of the raft and gone down the slope, go to the right and slide through the gap there, then go down below. From there, go to the left to escape from the E.M.M.I. Zone.
Acquire an Item Sphere
Go to the left and enter the water, then go to the left and jump up to the ledge. Go left to drop down to a platform where there is an Energy Recharge Station.
From there, go left and kill or avoid the two creatures in the room. Don't go through the door on the left; you can see cold air streaming out of it, and right now you are vulnerable to the cold. Instead, shoot the red thing on the left side of the floor and go through the opening that is revealed.
Drop down below and shoot the red cover with a missile, then shoot the door to open it. Go through.
Kill the flying creature and go down to the bottom, killing the crawling creatures in the way. Go to the left and slide through the gap. Shoot the item that the statue is holding, then jump onto the item to get the Charge Beam. A tutorial will show you how to use it. Hold the Y button to charge your beam. You can view this tutorial at any time by going to the pause screen, pressing R to view your abilities, then selecting Charge Beam.
Get an Energy Tank
Jump up to the ledges on the right and use the Charge Beam to shoot the door and open it. In the next room, go to the right and shoot the next door with a charged shot. There will be a large creature in the next room. You can kill it with two charged shots. Keep going to the right, and you eventually reach another Charge Beam Door. Use a charged shot to open it, and go through.
Jump up the ledges, then slide through the gap on the right. Collect the Energy Tank from the bottom of the area.
Artaria E.M.M.I. Zone, Part 4
Slide through the gap to the left, and go up the ledges. At the top, use a charged shot to open the door. Go to the right and slide through the gap, then go to the right and make your way up the area. Ignore the door to the right, and instead go up and left. At the top, go through the upper-left door. Save in the save room if you wish, then go through the door on the left. Go down to where there is a Charge Beam Door on the right. Shoot it with a charged shot and go through.
Go to the right to drop down below. You can't get the Missile Tank right now, so ignore it and go through the E.M.M.I. Zone Door on the left.
There will be a brief cutscene. Go to the left and shoot a charged shot at the door to open it, and go through. There will be another brief cutscene. Go to the left side of the room and make your way upward. Go through the door on the left.
Go left and slide through the gap, and make your way up. You will soon hear the E.M.M.I. If you are quick enough, you can jump up above and start running to the right. If not, go back down to the bottom of the area and wait for the E.M.M.I. to go past, then when it is out of range to detect your vibrations, make your way upward when it is safe to do so. After you have gone as far up as possible, go to the right and go through the door.
Go to the right, jump onto the first platform, then slide through the gap and go to the right. Slide through the gap to land in the water, then jump up and go through the E.M.M.I. Zone Door to exit the E.M.M.I. Zone.
Get a Third Missile Tank
Go to the right and use two charged shots to kill the large creature, and continue going to the right. Ignore the door on the right and make your way upward. At the top, go to the left and go through the door. Save your game if you wish, then jump up to the right and shoot a charged shot at the door to open it.
Go to the right and slide through the gap to get the Missile Tank.
Activate a Device
There is a dead end to the right, so jump up to the left and stand in the middle of the platform. Shoot the ceiling to open a path. Jump up through the hole that you opened, kill the two flying creatures, and go to the right. Slide through the gap on the right.
Go to the right and jump up onto the ledge. Shoot a charged shot at the door to open it. Go to the right through the tunnel, and go through the door at the end.
Go downward through this room (ignore the two doors at the top that have heat coming out of them; you are vulnerable to heat right now). At the bottom, go through the door on the left to reach a save room.
Go through the door on the left, get past the creatures in the next room, and go through the door on the left. Go to the left side of the room and jump onto the ledge. Stand on the glowing panel to activate the device. The locked door down below will open. Go through it.
Make your way upward through the next room. At the top, shoot the red thing in the ceiling to open a path. Jump up through where the you broke through the ceiling. Go through the door on the left. Keep going left and slide through the gap, then go through the door on the left.
In the network station, stand on the glowing panel to get a briefing. Afterward, go through the bottom-left door. There is a Total Recharge Station in this hallway. Use it if you wish, then go through the door on the left.
Artaria E.M.M.I. Zone, Part 5

Go to the left and downward. There is a Thermal Door at the bottom left of the area that will now open. Carefully make your way to that door without letting the E.M.M.I. see you. It can only see as far as its forward sensor, so just stay out of range of the cone in front of it to avoid being seen. The Thermal Door doesn't open right away, so be careful to avoid the E.M.M.I. while you wait. Go through it as soon as you safely can.
From there, go to the left side of the room and go down to the bottom of the area, where there is another Thermal Door. Go through it as soon as it opens.
Go left and a trap door will open beneath you, dropping you onto a series of steep slopes. When you reach the bottom, go to the right and slide through the gap, then go up onto the ledge above the gap that you just came out of. Go up another ledge, then go to the right, and jump up onto the ledge up above where there is a Charge Beam Door. Shoot a charged shot at it, then go through it.
Jump up onto the ledge to the right. At the right side of the room, slide through the gap.
Artaria Central Unit
There will be a brief cutscene. You must now fight the Central Unit. Shoot the metallic eyeball monster with missiles or charged shots while dodging the rings and the laser from the turret on the wall. You can shoot the rings with missiles or charged shots for a chance to get health and ammo.
After the Central Unit dies, there will be a cutscene, and your Arm Cannon will again be upgraded into the Omega Cannon.
The door of the chamber has a heat shield on it. You will need to hold L and Y to fire constantly at it with the Omega Stream. This will make the heat shield heat up and eventually be destroyed. After that, you can hold L and R to charge up the Omega Cannon, then shoot it at the red dot on the door to open it like before. Before you leave the boss room, you may wish to read the section below for advice to help you prepare.
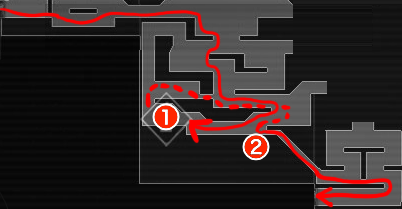
E.M.M.I.-02SM (White E.M.M.I.)
The E.M.M.I. can sense the energy from your Omega Cannon, so it will begin pursuing you. You will be able to see its position on the minimap and pause screen map if it is close enough. After you leave the boss room, go left and downward, then go right and down to reach the bottom of the area. Shoot open the door on the left but don't go through yet; just stand in the doorway so it can't close again. Watch the minimap and pause screen map to see the E.M.M.I.'s location, and face the direction that the E.M.M.I. is coming from.
Remember to avoid physical contact with the E.M.M.I. at all costs. Otherwise it will catch you and you will have to perform a Melee Counter at the exact moment of the flash, and if unsuccessful (which is likely), you will get a Game Over.
While standing in the doorway as described above, watch the minimap for the red dot that shows the E.M.M.I. approaching from above. Hold L and Y to shoot a constant barrage with the Omega Stream, and as soon as you can see the E.M.M.I., aim the barrage at the heat shield that covers its head. The shield will heat up just like the door of the boss room, but more slowly than the boss room door; but the E.M.M.I. will also move more slowly when you are hitting the heat shield. When the E.M.M.I. gets close, it will start to stand up, so be prepared to change your aim if it starts standing up. If the E.M.M.I. is getting too close and you won't have enough time to destroy the heat shield, run farther away and try again. Keep in mind that this E.M.M.I. cannot go through narrow gaps, so if you slide through a gap, the E.M.M.I. go a different way.
After the E.M.M.I.'s heat shield is destroyed, the E.M.M.I. will temporarily be stunned, but not long enough for you to charge up the Omega Cannon, so run left through the door that you were standing in, if you are still there, and if you are not still there, focus on getting far enough away from the E.M.M.I. (remember that you can press ZL to slide under it while it is stunned, if you are in a dead end). When you are in a good position where you will have a clear shot at its head when it starts coming toward you, face the direction that the E.M.M.I. is coming from, charge up the Omega Cannon (hold L and R) and then when it is fully charged, aim and press Y to shoot the red dot on its face to defeat it. Again, if the E.M.M.I. gets too close before you have time to charge up the cannon, or if you miss, run away and put some distance between you and the E.M.M.I., and try again, and remember that this E.M.M.I. cannot go through narrow gaps, so if you slide through a gap, the E.M.M.I. will go a different way.
After you defeat the E.M.M.I., you gain the Spider Magnet ability. It allows you to grab and climb along blue, magnetic walls and ceilings. Just jump up against a blue wall or ceiling and tilt the left control stick in the direction of the magnetic surface to grab it.
You can now proceed through Artaria on your way to the next area.