
After you obtain the Diffusion Beam in Cataris, you find a Teleportal that takes you back to Dairon.
Reach the E.M.M.I. Zone
Shoot a charged shot at the red thing in the floor on the left to break open a path. Drop down below, then go to the right and roll through the tunnel on the right. Shoot the Wide Beam Cover on the right to destroy it, then shoot the door to open it. Go through.
Jump up and roll through the tunnel to reach the right side of the room. Be careful of the robot on the wall. Go to the left and climb into the tunnel in the middle. Go to the left to fall down below. You will see an Energy Part beneath you. Because of the lava beneath it, you won't be able to get it now. There is also a hidden door in the bottom right of the room that you can reveal by shooting the floor on the right side of the room, but it leads to a dead end for now.
In the room where you see the Energy Part, shoot the left door with a charged shot and go through.
Go left, get past the robot down below, then jump up to the ledge on the left. Shoot a charged shot at the door on the left, and go through to find a Network Station. Stand on the glowing panel on the floor and you will get a briefing and can save the game. Afterward, go through the left door.
Go through the narrow gap to the left and kill the creature. Climb up the blue wall and roll into the tunnel at the top, then quickly jump up to avoid the saw blade that the machine rolls at you. There is an energy recharge station at the top left that you can use before entering the E.M.M.I. Zone if you wish.
Dairon E.M.M.I. Zone, Part 1
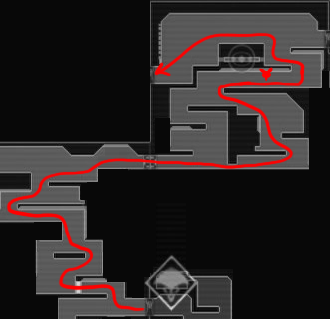
When you are ready, enter the E.M.M.I. Zone. Jump up onto the ledge on the left and shoot through the wall on the left. Jump up onto the ledge above the wall that you destroyed, and jump up onto the next ledge. From there, jump onto the blue wall and climb up. Drop down when you reach the top, then go to the left. Jump up onto the ledge on the right, then from there, jump up onto the next ledge on the right. Keep going to the right and go through the door on the right.
Go to the right and slide through the gap, then jump up onto the ledge above you. Grab the blue wall and climb up, then shoot a charged shot at the red thing in the box on the left. From there, go left and jump up onto the ledge on the right. Go to the right, but be careful of the spiky robot that flies up from the floor. Kill it with a missile to prevent it from exploding and damaging you, and possibly alerting the E.M.M.I. Then go right and jump up onto the ledge on the left. Keep going left to reach the exit from the E.M.M.I. Zone. Go through.
Activate a Device
Go to the left and kill another spiky robot, then roll into the tunnel on the left and you will fall through some Pitfall Blocks. Go through the door on the left.
Go upward through this room and you will find a Total Recharge Station, but it can't be used until you turn on the power, so keep going up through this room, killing the creatures that you encounter on the way. Go through the door at the top left of the room. It leads to a Save Room, but it can't be used until the power is restored. Go through the door on the left.
Go to the left and drop down below (the red creature in the wall is too far for your Diffusion Beam to hit). Make your way down to the bottom of the room, and go to the bottom right, where you can grab a blue ceiling. Climb along it, then make your way up the ledges above, and go through the door on the right. Jump up onto the platform and stand on the glowing panel in front of the device to activate it.
Get an Item Sphere
The area to the left is now extremely cold and you can't safely enter it, so go to the right and shoot the red thing in the wall on the right to break open a path. Roll through the tunnel that you revealed to reach the next room.
Make your way upward through this room again. You can use the Total Recharge Station on the way if you wish. At the top of the room, roll through the tunnel on the right, then shoot the door cover with a missile, and open the door and go through.
Shoot the item sphere in the statue's hands and take the item to get Bombs. You can use bombs by pressing Y when in Morph Ball mode. If you enter a Morph Ball Launcher, you can press Y to activate it.
Get a Missile Tank
Go to the left and use bombs on the floor to reveal a hidden room. Fall into it, then go to the bottom right corner and use bombs there to break open the wall. Then go to the right, switch to Morph Ball, and press B while in Morph Ball form to jump up to the wall of the room with the Missile Tank in it. Press Y to place a bomb there, then go through the tunnel that you opened to get the Missile Tank.
Reach the E.M.M.I. Zone Again
Go to the bottom right of the room and enter the Morph Ball Launcher, then press Y to drop a bomb, activating the Launcher. You will emerge at the Total Recharge Station.
Go down to the bottom of the area and go through the door on the left. Go to the left and down to the bottom left corner, where there is another Morph Ball Launcher. Enter it and press Y to activate the Launcher.
In the room where you end up, you will see Corpius in the background. Go to the left and go through the door.
Make your way to the bottom of the room past the laser turrets on the walls. There is another Morph Ball Launcher at the bottom left. Use it, then go through the door on the left to reach a Save Room.
Leave the Save Room and go to the bottom-right Morph Ball Launcher. Use it and you will end up near an E.M.M.I. Zone Door.
Dairon E.M.M.I. Zone, Part 2
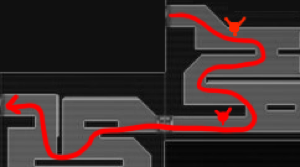
Go to the right and down, avoid touching the spiky robot in the floor and try to kill it with a missile before it explodes, then go to the left and down, then go to the right and down. Avoid touching the spiky robot here as well, and try to kill it, then go to the left and through the door there.
Slide through the gap on the left, then slide through another gap on the left, then jump up onto the blue wall above you. Jump from the blue wall to the E.M.M.I. Zone Door on the left.
Go to a New Area
Make your way through the straightforward room and you will reach a shuttle area. Stand on the glowing platform in front of the shuttle and go to Burenia.