
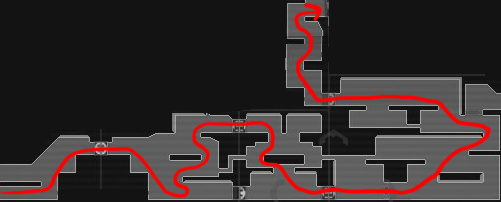
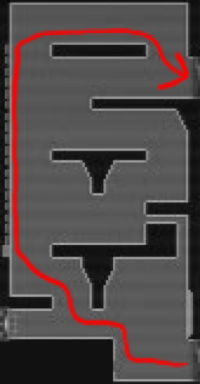
After you defeat two E.M.M.I.s and kill Corpius, you are able to reach the next area of ZDR: Cataris.
Activate a Device
Ignore the door on the right, and instead shoot the walls to the left to break through them. As you go to the left, beware of the creatures that come out of the ceiling.
Wait for the flames to stop shooting out of the blue walls, then drop down below. Wait for the flames to the left or right to stop, then go past. Land next to one of the flamethrowers below, then go past when it stops. Shoot the robot with missiles, or if you are at close range, you can use a Melee Counter on it when it flashes. Beware of the flames that it shoots out to its sides. Go farther down and defeat another robot, then at the bottom, go through the door on the left. You will reach a Network Station. After a briefing, you can save the game.
Leave the save room via the door on the left. Ignore the door directly below you, as it leads to a dead end. Go down to the bottom of the area, and the Thermal Door at the bottom right will open. Go through. Then go through the upper left door. Stand on the glowing panel in front of the device to activate it.
Reach the E.M.M.I. Zone
Go back through the door, then shoot the lowest block of the wall on the right, and slide through the gap. You can use the Total Recharge Station if you wish. Then jump up onto the ledge above you, and shoot the red thing in the ceiling to open the path.
Jump up onto the ledge, then go left and through the door. Make your way downward to the lower left of the room, and go left to enter the next area.
Jump up through the gate that opens. Go to the left side of the room and grab the blue wall when it appears. At the top, jump onto the ledge. Make your way to the right until you can jump up onto the ledge to the left. Go to the left side of the room and jump up to grab the blue wall. Climb along the blue wall until you can land on a platform below you. Jump up and grab the blue ceiling on the yellow track, and shoot the flying creatures with missiles to prevent them from knocking you off. When you reach the right side, drop down onto the platform beneath you. Ignore the door on the right and jump up onto the ledge on the left. Go to the left side and ignore the door, and shoot the red thing in the wall below the door. Slide through the gap that opens.
Go to the left and jump up onto the ledge, then slide through the gap on the left. Shoot the walls in your way and go to the left, and slide through the gap at the end.
There is a glowing blue door on the left that can't be opened, so jump up onto the ledge above it. Make your way up the room, and when the path splits, stay on the left side. At the top, you will reach an E.M.M.I. Zone Door. When you are ready, go through.
Cataris E.M.M.I. Zone, Part 1
There will be a cutscene where Samus activates the Phantom Cloak to hide from the green E.M.M.I. that appears.
Unlike the white E.M.M.I. in Artaria, the green E.M.M.I. can crawl through narrow spaces.
Go up the ledges to the right and shoot a charged shot at the door to open it. Go through.
Whenever you are close enough to the E.M.M.I. that you can see the red dot on the map, you may wish to activate activate the Phantom Cloak so it won't hear you, but deactivate it as soon as you are far enough away so you don't run out of Aeion.
The bottom right of this room is a dead end, but you may be forced to use the Phantom Cloak to hide there from the E.M.M.I. Remember that if you grab a blue ceiling, you can push up on the left control stick to push yourself flat against the ceiling, which may be necessary to avoid touching the E.M.M.I. Get onto the ledge above the dead end as soon as possible.
Jump up the ledges to reach the door at the upper right. Shoot it with a normal shot and go through.
Go downward and slide through the gap below the middle platform. You can optionally turn left and shoot a charged shot at the door on the left to give yourself an escape route if needed, but don't go through that door; turn right and shoot a regular shot at the door on the right to open it, then go through it.
Go to the right and a gate will close behind you. Go farther right and grab onto the blue surface to climb to the top of the platform. Jump up onto the ledge to the right, then jump up onto the platform on the left. Grab the blue surface above you, and jump onto the ledge to the left of it. Go left and jump over the gap to reach the ledge with the door. Shoot it with a charged shot and go through.
Go upward and you will reach an E.M.M.I. Zone Door. Go through.
Activate Second Device
After you leave the E.M.M.I. Zone, you will find a device. Step on the glowing panel to activate it.
Cataris E.M.M.I. Zone, Part 2
Go through the door on the right to find a Save Room. Save the game if you wish. You can go through the door on the right to find an Energy Recharge Station. There is just a dead end beyond the Energy Recharge Station, so you will have to go back into the E.M.M.I. Zone. Go to the left until you are back in the E.M.M.I. Zone.
Go to the bottom of the area and go through the open door on the right. Watch for the E.M.M.I. and use the Phantom Cloak if needed. Drop down to the lower area, and the E.M.M.I. should go through the door on the left. When its red dot on the map is far enough away, deactivate Phantom Cloak and slide through the gap to the right. The gate at the upper right will open. Jump up through where it was and go through the E.M.M.I. Zone Door on the right.
Activate a Third Device
Go to the right and ignore the first door. Make your way up to the second door. Go through it.
There are blue panels above, but they are not moving, so just go through the door on the right.
Go to the right and drop down to the lower level. You can ignore the red thing in the wall for now; it just leads to a super-heated area that you can't safely enter right now. Instead, go to the left and use the Phantom Cloak to go through the sensor gate.
Slide through the gap on the left, then shoot a charged shot at the green device on the left. This will activate the machine above.
Activate a Fourth Device
Go back the way you came until you reach the area with the two blue wall panels that are now moving up and down. Jump onto the blue panel on the left. When it reaches the top, jump onto the blue wall on the right, then jump onto the ledge to the left. Go through the upper left door to proceed.
Keep going to the left and you will find another device. Stand on the glowing panel to activate it.
Cataris E.M.M.I. Zone, Part 3
Go back the way you came, using the Phantom Cloak to get through the Sensor-Lock Door on the way. After you go through the Sensor-Lock Door, go to the door just below you and shoot a charged shot at it to open it, then go through it, then go to the left and make your way down to the Energy Recharge Station. Go left from there to go through the Save Room. Continue going left. Go back into the E.M.M.I. Zone.
In the E.M.M.I. Zone, jump up onto the platform on the left. The Thermal Door to the left will open. Drop down through where it was, and there is an E.M.M.I. Zone Door to the left, but unfortunately, it leads to a dead end, so you will have to go back into the E.M.M.I. Zone.
If the E.M.M.I. is near, you may wish to activate Phantom Cloak to avoid being detected. Go to the right and drop down below, and go through the door on the left. Then go left and slide through the gap in the floor. Go left and jump across to the ledge on the left, then go left to the next room.
Shoot through the first wall on the left. In the second wall, only the bottom block can be destroyed, so shoot it and slide through the gap, then shoot through the next wall to proceed. Go left and down to the bottom of the room, where there is a Sensor-Lock Door. Activate Phantom Cloak and go through it.
Go to the left side of the room, then go through the door on the left. From there, go to the left and climb up the blue wall. At the top, go left, then make your way down to the bottom of the room. Go through the E.M.M.I. Zone Door.
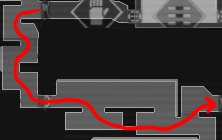
Reach a Network Station
Jump up onto the platform on the left, and go through the door to the left. Beware of the creatures that pop out of the floor and ceiling, and go through the door on the left.
Go to the left and jump up onto the ledge, then continue going up the room. You can ignore the red thing in the wall on the right for now; it leads to a super-heated area that you can't safely enter. Instead, jump up and grab the blue ceiling, then drop down and grab the blue wall on the left. At the top, jump onto the ledge on the right, then jump to the ledge on the left. Shoot the creatures going around the platform above you, then get on top of that platform. Then make your way up the platforms on the right, and finally go through the door on the right.
Step on the glowing panel to get a briefing. Save your game afterward if you wish, then go through the door on the right.
In this room, the path below leads to a dead end (shooting the red thing in the wall just opens a path to a super-heated area), so you will have to go through the E.M.M.I. Zone door on the right.
Cataris E.M.M.I. Zone, Part 4
Go to the right and drop down. Your goal is to go to the bottom right of the room, then slide through the gap on the left, but depending on where the E.M.M.I. is, you may need to activate Phantom Cloak and go to the area on the left with the blue ceiling above it, and hide there from the E.M.M.I. until it leaves the area. Make sure not to deactivate Phantom Cloak until the E.M.M.I. is far enough away that you can land on the ground without it hearing you. When it is safe to do so, go to the bottom right of the room and slide through the gap to the left.
From there, go left and drop down below, then go to the right and go through the door.
There is a flying robot that goes left and right under the blue ceiling. Be very careful not to hit it, or the E.M.M.I. will hear. If the E.M.M.I. is nearby, wait until the last possible moment to activate Phantom Cloak, then jump up and grab the leftmost or rightmost side of the blue ceiling, so that you will be out of range of the small flying robot. Don't deactivate Phantom Cloak until the E.M.M.I. goes toward the door on the left and you can land to the right of it without touching it. Don't move until the E.M.M.I. is far enough away that it won't hear you. Then go to the right and slide through the gap.
From there, go to the right, go through the door, then go to the right and go through the door there to leave the E.M.M.I. Zone.
Get the Map
You will arrive in the Map Station. Stand on the glowing panel to download the Cataris map.
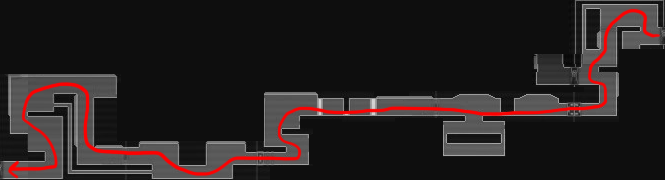
Activate a Fifth Device
Go through the door on the right, then climb the blue wall up to the E.M.M.I. Zone door at the upper left. Go through.
Go left and jump up onto the ledge on the left, then jump and grab the blue wall. It will take you to the top of the room. If you have been using the Phantom Cloak, deactivate it when you reach the top so you can jump far enough to reach the platform at the top. From there, go right and through the E.M.M.I. Zone door.
Activate a Sixth Device
Get past the creatures on the right, then go to the right and wait for the flames to stop before you slide through the gap. Go past the flamethrowers and slide through the gap on the right. Continue along the path, sliding under the gaps and flamethrowers, then shoot a charged shot at the green device on the left to activate it.
Go to the right and slide under the gaps (the flamethrowers stopped when the device drained the lava). Then go to the right and grab the blue wall on the right to reach the ledge at the upper left. Go left to the next room, slide through the gaps (these flamethrowers have been deactivated as well), then go back through the E.M.M.I. Zone Door on the left.
Cataris E.M.M.I. Zone, Part 5
In the E.M.M.I. Zone, drop down to the nearest platform below you, and carefully make your way to the bottom-right of the room by continuing to fall onto the nearest platforms below you. (The farther you fall, the more likely it becomes that you will land near the E.M.M.I. and be detected.) When you reach the bottom and see the locked door on the left, go to the right to exit the E.M.M.I. Zone.
Go to the right and you will slide down the slope. The blue walls are rising and falling now, so grab the one on the right. At the top, grab the blue wall on the left, jump onto the platform at the top, kill the creature that shoots toward you from the ceiling, then drop down to the right. Go through the E.M.M.I. Zone Door on the right.
Only use Phantom Cloak if the E.M.M.I. is going to see you. Then quickly go upward, grab the blue wall on the left, deactivate Phantom Cloak, then jump onto the top of the platform and go through the E.M.M.I. Zone Door at the top right.
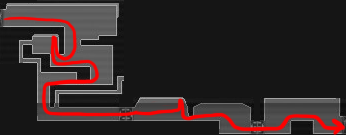
Get an Energy Part
Go through the door on the right to reach a Save Room, then go through the door on the right to reach an Energy Recharge Station. From there, go up to the top left of the room, grab the blue wall on the left, and shoot upward to break the blocks above you. Go up past where the blocks were and shoot a charged shot at the door on the left.
Go to the left, be careful of the creature coming out of the ground, and slide through the gap on the left. Go up and climb up the blue wall, then grab the blue wall on the right to pull the platform down.
Drop down from there. If you want an optional, slightly difficult-to-get item, go to the left. At the left side, kill the flying creature and wall creature, then jump up against the wall and press B to do a Wall Jump. Use Wall Jumps to reach the area at the top. Then go to the right and slide through the gap at the right side. Take the Energy Part at the end of the path. Slide through the gap on the left, and go left until you drop down to the lower level.
Get a Missile Tank
Go right until you can slide through the gap at the rightmost side. Jump up the ledges and go through the door on the right.
Shoot through the blocks in the floor and go through the door on the right. Then go to the right to drop down to the bottom of the area with the rising and falling blue walls. Go left from those blue walls, and go through the door there. From there, go downward to the Charge Beam Door on the right. Shoot a charged shot at the door and go through. Go to the right, past the ceiling robot, and jump over the gap. (The area below is a dead end.) Shoot a charged shot at the door on the right, and go through.
Kill the stone creature on the floor, then go to the rightmost side of the room and shoot the ceiling. Take the Missile Tank, then go to the left to exit the room.
Get an Energy Tank
Go to the left, jump over the gap, and go through the door at the left side. Jump up onto the ledge on the left, then jump up onto the ledge on the right and open the door. Go through.
Grab the blue wall on the left when it comes down, then when you reach the top, grab the blue wall in the middle, then jump onto the ledge on the left. Jump up from there to reach the door at the upper left. Go through.
Go left and jump up onto the ledge, then keep going left to reach the path that you opened earlier. Take the Energy Tank that is on the ledge.
Activate a Seventh Device
From there, jump onto the ledge to the right, then go up through the Thermal Gate that opens. You can optionally go through the door on the right to find a Total Recharge Station. Then from the door, go left and jump over the gap, then go left and jump onto the ledge. Go left and slide through the gap. Stand on the glowing panel to activate the device.
Reach the Next Area
The Thermal Door on the left will open, so go through it. Go to the left, then jump up onto the ledge. From there, jump up and to the right, and make your way up to the top of the room. The path from here is straightforward, so just keep going until you reach a door at the bottom left. Open it and go through.
Go to the left and step on the glowing panel, and you will take the shuttle to the next area, Dairon.