
After you use the Ocarina to wake up the turtle in the northwestern part of the Tal Tal Mountains, you can enter the final dungeon, Turtle Rock.
Reach a Mini-Boss
Go north and you have to fight Vire. If you have the boomerang, in the Game Boy version it will kill Vire with one hit. Otherwise, avoid the orbs of energy that it throws at you, dodge when it flies at you, and hit Vire with your sword or other weapons until it dies. After that, go west.
Reach a Second Mini-Boss
Kill the ropes, then go north. Kill the Hinox. Again, the boomerang works best. Afterward, go west.
Get 20 Rupees
The strange moving block in this room can cover up the holes in the floor. Just push the block and then use the directional pad to change the block's direction. Make it go left four times, then up twice, then left, then down until it has covered all the holes. After that, a chest will appear that contains 20 rupees.
Go south from this room.
Get 50 Rupees
You can use the Boomerang to get rid of the Sparks in this room. Jump across the gap and open the chest to get 50 rupees.
Go west from this room.
Defeat Rolling Bones
Jump over the spiky rolling thing and hit Rolling Bones until it dies. Again, the boomerang is a good weapon to use.
After Rolling Bones is gone, go north.
Get a Key
Vire appears again. Kill it as before to make a key appear.
Go south from there, then south again.
Get the Compass
Go to the southeast corner of the room and hit the Vacuum with your sword to kill it, then open the chest to get the Compass.
Get the Map
Now go back to the dungeon entrance. You can play Manbo's Mambo to get there, or just save and quit, then start again. Or go north, then east, then north, then east, then south, then east. You will be back in the room where you first fought Vire. The Vire is there again. Go north from the room with the Vire, then go east.
Push the moving block up two squares, then left two squares so that it creates a path between the two blocks on the left side of the room. Follow the path that you created and go west.
There are three blocks to your left that are preventing you from reaching the treasure chest. Push the top and bottom blocks to the left, then push the middle one down or up. There are two green Zols hiding next to the treasure chest, so be careful. Open the treasure chest to get the Map.
Get the Stone Beak
In the same room where you got the map, look for the cracks in the north wall. Bomb the cracks, then go north through that exit.
Go to the left and go down the stairs. Use the Roc's Feather to jump over the lava, but be careful of the Podoboos that jump out of the lava. They can't be damaged by any weapon, so just avoid them.
Go to the right to reach the next room. Jump up and press up to hold onto the ladder. Go to the right, but avoid the Podoboos that come out of the lava. On the right side of the room, jump from the ladders to the ladder on the right, and go up.
Lift the pots to go through this room. Kill all the Ropes to open the door. Open the chest to get the Stone Beak.
Fight Smasher
Go north from the room where you got the Stone Beak. Smasher is here. Use the Power Bracelet to pick up the ball and throw it at Smasher. Do this until Smasher is defeated.
Get a Second Key
You can optionally go north to talk to an Owl Statue, but don't go down the stairs there. Just lift the pot and step on the switch to open the door and go back to the room where you fought Smasher.
From there, go west.
Push the moving block left two squares, then up and left until it reaches the top of the room, then push it left to the top-left corner, then push it down and right until it reaches the bottom of the room, then push it right, then up, then right, then down, then right so that it reaches the bottom-right corner. The following image illustrates the path that you need to push it.
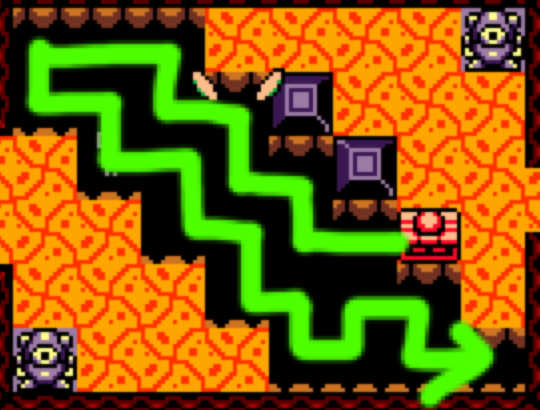
If you cover up the entire floor, a key falls from the ceiling. Kill the two green Zols hiding in the floor, then take the key.
Get a Third Key
In the same room where you got the key, bomb the middle of the north wall, then go north through the hole.
Don't hit the crystal switch in this room. Instead, bomb the middle of the left wall and go west through the hole.
Go south using the stairs at the bottom-right of the room. Go south to the next screen. Jump down from the ledge, but don't open the treasure chest, because it contains a green Zol. Instead, go west.
This room has a bunch of pots, a couple of Sparks, and a bag of Magic Powder. Go west from this room to return to the first room where you fought Vire.
Go north from the Vire room, then east. Push the moving block so that it ends between the two blocks on the north side of the room, then walk up the path that you created, and push the rightmost block to the right. Go up the path that you opened and exit north.
Unlock the key block, then go east. Kill the Vire using the boomerang (if you have it) or your sword, then go east through the locked door.
Go past the Blade Traps, then use the one-way door in the north wall.
You can talk to the Owl Statue in this room if you wish. Otherwise, kill the four green Zols that are hiding in the floor, then go north through the door.
In this room, you have to kill the Gibdos, but be sure to keep moving so that the cracked floors don't break under you. The boomerang will get rid of the Gibdos in three hits. After you get rid of both Gibdos, a key falls from the ceiling. If it falls into a hole, just leave the room and come back, and it will reappear. Take it, then go west.
Get a Fourth Key
Ignore the Dodongo Snakes in this room. If you kill them, a chest appears where you can't reach it, but the chest will disappear when you leave the room. If you want the chest, you will have to wait until you are on the ledge to kill the Dodongo Snakes, which you will do later. For now, go west.
Jump over the gap, but be careful of the green Zols that will appear as soon as you jump over. Go north up the stairs to the next room. If you do not have any Secret Medicine, you can use the Hookshot to reach the chest in the north part of the room and open it to get Secret Medicine. But if you DO have Secret Medicine, don't bother opening the chest, because you can only hold one at a time, and in the Game Boy version, the one from the chest will just disappear if you try to take it (in the Nintendo Switch version, you will just put it back into the chest).
Jump down to the lower area on the right and collect the flying items, then go north. Go up the stairs.
Go east, get past the Goomba, and use the Roc's Feather to jump onto the ledge. Go east to the next area. Jump up onto the ledge to the right, then jump straight up and press up to climb up the ladder. At the top, use the Hookshot on the statue on the right side of the room, but wait for the Podoboos to fall back into the lava before you hookshot across. From the right side of the room, go down the ladder.
You have been in this room before. Go north through the one-way door again. Use a bomb on the middle of the left wall (if you bombed the cracked blocks you would see that the tiles in this room are in the shape of an arrow that points left), then go west through the hole that you created.
You can optionally use Magic Powder to light the torches. Go to the north part of the room and jump over the pit, then to the bottom-left corner of the room (being careful of the green Zols that pop out) and unlock the key block, then go west.
Kill the rope and go west.
In the room with Ropes and a Peahat, use a bomb on the middle of the left wall. Go west through the hole that you opened.
There is lava directly in front of you, so jump over it. In the Nintendo Switch version, go to the platform south of the statue in the lava and walk up the ramp on the left or right to stand on the platform. Shoot the statue with an arrow to make a key fall from above. Take the key.
Get a Fifth Key
If you want bombs, arrows, or hearts, go south from the room where you shot the statue. Then return to the room where you shot the statue, and go west.
You might want to equip your Mirror Shield in this room. Stand below the block that is to the left of the treasure chest, and push that block up. Then push the block below the treasure chest to the LEFT. Open the chest to get a key.
Get Another 50 Rupees
If you pushed the block to the right before getting the key in this room, your path is blocked. Just go up the stairs and exit south, then go north again to where you got the key. This resets the positions of the blocks.
Go east from the room where you got the key, then go north.
Kill the Ropes and Vire, then go west. Go north up the rightmost stairs and then go east. Use the Hookshot to reach the treasure chest on the right side. Open it to get 50 Rupees.
Get a Piece of Heart
Jump down from the ledge where you got the rupees, then go up the stairs in the north wall. You will be outside. In the Game Boy version, there is a Piece of Heart up above. In the Nintendo Switch version, open the chest to get a Piece of Heart.
Get a Sixth Key
Go east along the bridge and you will find another warp point. In the Nintendo Switch version, stand on it to activate it. In the Game Boy version, seeing it is enough to add it to the warp points that you can go to.
Go east from here to find another entrance into Turtle Rock. Go in.
Throw bombs from above so that the Dodongo Snakes eat them. Try throwing the bombs directly at their mouths. After both Dodongo Snakes are dead, a chest appears on this ledge. Open it to get a key.
Reach a Third Mini-Boss
After getting the key from the Dodongo Snakes room, go back to the entrance by either playing Manbo's Mambo on the Ocarina, or saving and quitting then reopening the game.
From the entrance, go north to the first Vire room, then go north from there, then east. Push the moving block up one square, then push it to the right until it stops. Walk along the path that you created and exit to the east.
Go to the east wall. If there is not a hole in it, put a bomb in the middle of the east wall to open a hole. Go through. Hit the crystal switch.
From the crystal room, go west, then south down the stairs, then south and jump down the ledge. Ignore the chest if you haven't opened it, since it just contains a Zol. Go west from there until you are back in the first Vire room.
From the Vire room, go north, then east to reach the moving block room again. Push the moving block so that it ends between the two north blocks. Go up the path and push the rightmost block to the right. Then exit north, then go east until you reach the room with the one-way door. Go through it.
Go west until you are in the room with Ropes and a Peahat. Go up the stairs and unlock the key block, then go east.
Use the hookshot to reach the southern platform. Unlock the key block, then go down the stairs.
Use the Roc's Feather to carefully jump on the moving platform, then jump on the hanging platform and wait for the second Podoboo to fall back into the lava, then jump down to the moving platform again and jump to the right side of the room. Go east, then use the moving platforms to reach the ladder on the right side. Go up.
Jump down the ledge to the south, then go south.
Blaino
Blaino protects himself with his gloves, so you have to wait until he punches before you can hit him. Blaino has weak punches, medium punches that can stun you, as well as a powerful punch that will send you back to the dungeon entrance in the Game Boy version, or back to the previous room in the Nintendo Switch version, if it hits you. Blaino always spins his glove before the powerful punch, so just move out of the way when he does this. Don't bother trying to hit Blaino before he punches. Just keep moving and wait for Blaino to punch, then hit him. In the Game Boy version, you can charge up a Spin Attack and use the Roc's Feather to jump toward Blaino, then release the Spin Attack, and it will hit Blaino even if he has his gloves up.
Get the Magic Rod
After Blaino dies, go northeast. Go up the stairs and open the chest on the ledge to get the Magic Rod. You can use it to light torches from a distance, and you can use it to attack enemies.
Get a Seventh Key
Jump down from the ledge and go down the stairs. Go back through the lava area using the Roc's Feather.
When you are back in the dark room with the two torches, kill the Rope (if it is there), then go west until you are in the room with the Beamos. Go up the northwest stairs, then exit to the south.
Jump down from here and use the Magic Rod to light the two torches. Open the chest to get a key.
Reach a Fourth Mini-Boss
From the room where you used the Magic Rod to make the chest appear, you can play Manbo's Mambo to warp to the entrance. Go north to the first Vire room, then go north, then east to the room with the moving platform. Push the platform up once, then right until it stops. Go up both of the stairs in the south part of this room.
Use the Magic Rod to melt the ice blocks. Go west past the Goombas, then equip both the Roc's Feather and the Magic Rod. Jump, then when you are at the highest point of your jump, use the Magic Rod to melt the top layer of ice. Jump onto the ice with the Roc's Feather, then go west and jump up to where you can go down the ladder.
Go down the stairs on the left side of the room, then unlock the door and exit west.
Cue Ball
Cue Ball is only vulnerable from behind. Use the Roc's Feather to jump over Cue Ball, then hit it with your sword. The Magic Rod doesn't work on it. Neither does the boomerang. Try charging up a Spin Attack, then jump straight up when Cue Ball goes past, then release the Spin Attack.
After you hit Cue Ball enough times, it dies.
Get the Nightmare's Key
Go north through the door that opens in Cue Ball's room.
This is another moving block puzzle where you have to cover all of the holes. Start by pushing the block up until it is in the top-left corner, then push it right until it is past the torch, then push it down, then push it right so that it goes toward the other torch, then push it up, then push it right until it reaches the top-right corner. Then push it down until it is one square above the bottom row, then push it left, then up, then left, then down, then left, then up, then left, then down until it is in the bottom row, then push it right until it covers all the tiles.
Here is a picture to clarify the directions:
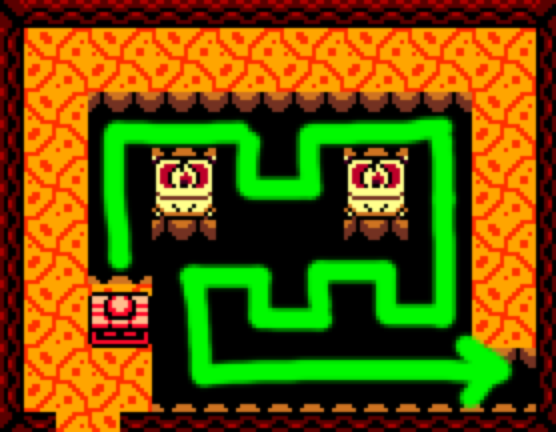
After that, a chest appears. Open it to get the Nightmare's Key.
Go to the Nightmare
From the room where you got the Nightmare's Key, go south to where you fought Cue Ball, then go east until you reach a room with a Vire and two Ropes. Go south from there until you are in a room with flying bombs, arrows, and hearts. Push one of the lower blocks into the lava and jump across, then go east.
Go east until you can go south. After you go south, you will be back in the room with lava and a moving block.
Go down and push the block into the lava, then jump to the right and push the block below you into the lava. Go east from there.
Jump down off of the ledge and go up the stairs.
Jump up and press up to grab the upper ladder, then climb to the top. Use the Magic Rod to melt the ice to the left, then go left and shoot fire upward at the ice above you. Jump with the Roc's Feather and when you get to the highest point in your jump, shoot the Magic Rod to the left. Walk left and stand on the far left column of ice. You will need to first melt the ice below you, then quickly start moving toward the left and use the Magic Rod to melt the ice to the left as you fall, and continue moving left to try to land on the left ledge as soon as you have melted the ice there. If you don't make it, just melt the blocks of ice to the right and go back to the ladder on the upper right, then try again. When you reach the ledge on the left side of the room, go west.
In this room, go to the bottom of the room and melt the bottom row of ice blocks. Then walk to the middle, then go one square to the right and melt the column of three ice blocks that touches the ceiling. Go back to the ladder and climb up, then use the Roc's Feather to jump to the left side of the room. Go down the ladder.
Go north and open the Nightmare's Door.
Hot Head
Hot Head jumps in and out of the lava. If the lava splashes on you, it hurts you for a lot of hearts. Stay in the middle so the splashes can't hit you. When possible, shoot Hot Head with the Magic Rod. This may be easier to do while standing still and just timing the shots based on Hot Head's movement. When you hit Hot Head with the Magic Rod, Hot Head's flames go away temporarily, and Hot Head will fly around the room for a while before jumping back into the lava and catching fire again. Hot Head will pause right after you knock its flames off, so be sure to keep shooting with the Magic Rod to hit it multiple times before it starts moving. Keep hitting Hot Head with fire from the Magic Rod and it will eventually turn into a smaller monster that jumps in and out of the lava quickly. Keep hitting it with the Magic Rod until it dies.
In the Game Boy version, a Piece of Heart will fall from the ceiling directly onto you. In the Nintendo Switch version, jump around the ledges to reach the Piece of Heart.
Get the Thunder Drum
Go north to get the final Siren's Instrument: the Thunder Drum. With this, you can go to the Wind Fish's Egg.
 Buy the Link's Awakening Link amiibo