
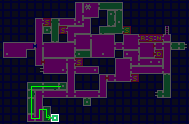
The following is a list of all of the upgrade locations in Metroid Fusion for missiles, energy tanks, and power bombs.
Collecting all of these will give you one of the two endings that are shown for 100% completion, depending on how long you took to complete the game.
In total, there are
- 48 Missile Upgrades
- 20 Energy Tank Upgrades
- 32 Power Bomb Upgrades
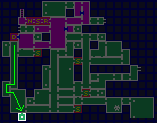
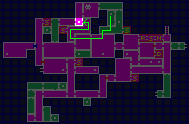
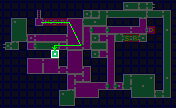
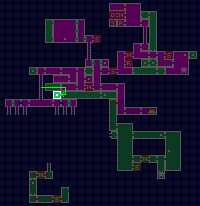
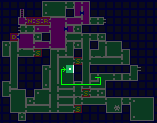
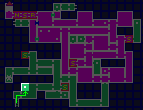
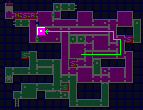
Missile Tank #1
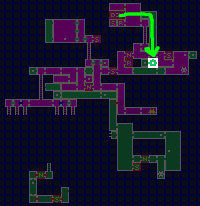
Available: After getting missile ability
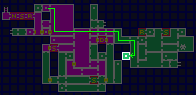
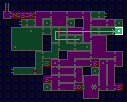
The first upgrade becomes available after you visit the data room to regain your missile ability. You will enter some hidden passages after shooting a panel in the large room to the right of the data room on the main deck. Eventually you will descend a tall room, and you will see this first missile tank in plain sight on the right.
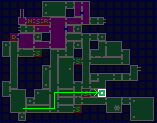
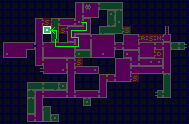
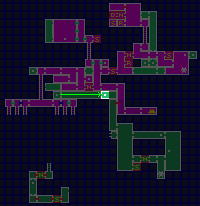
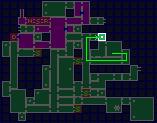
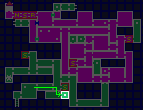
Missile Tank #2
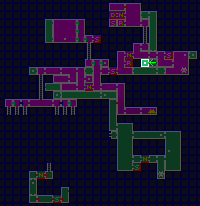
Available: After getting missile ability
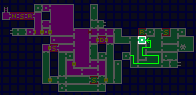
The next missile upgrade is close to the last one but is not out in the open. Go to the left from the previous missile upgrade and drop down. There is an exit to the left. Go through. There are three steps to the left. Shoot the top block of the top step to reveal a hidden missile upgrade.
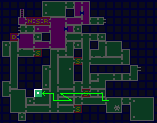
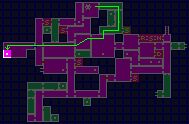
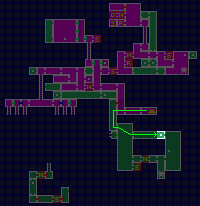
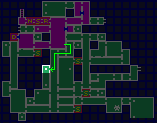
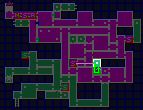
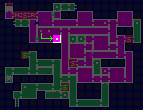
Energy Tank #1
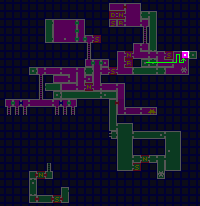
Available: After getting missile ability
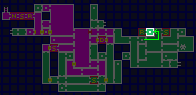
On the way to the first boss fight, you encounter a door eyeball (Gadora) After you kill it with three missiles and go through the door beyond, you will enter a room with ledges that you have to jump from to climb up the room. Eventually, you will find the first energy tank sitting out in the open.
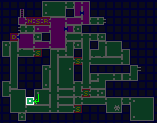
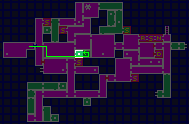
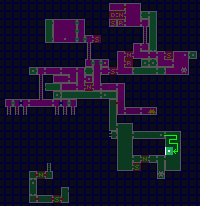
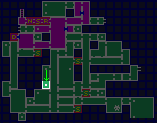
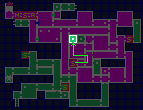
Energy Tank #2
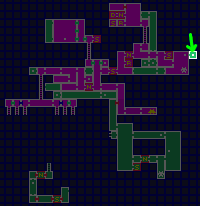
Available: After getting missile ability
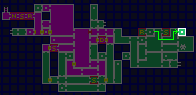
Just after the energy tank upgrade mentioned above, you can get a missile upgrade, but it's hidden. To find it, walk slightly to the right of where you got the energy tank. There is a part of the ceiling hanging down above you. Walk just past this hanging ceiling, then shoot two missiles straight up so that you hit the ceiling immediately to the right of the part that hangs down. Shooting with two missiles will open a secret passage in the ceiling. Jump up through the hole that you created, then go to the right. The small tunnel leads to an area with an energy tank.
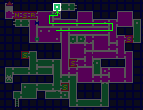
Missile Tank #3
Available: After getting morph ball ability
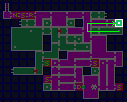
After Adam tells you that the breeding environments have been infected, you head to SRX. On the way up the tall dark room, there is a tunnel that you can roll through using your new morph ball ability. In the room that you reach, you find another missile upgrade.
Energy Tank #3
Available: As soon as you go to SRX
After killing the parasites that infested the first atmospheric stabilizer that you encounter in SRX, you reach a room with a bunch of hornoads hopping around. There is a metal pipe in the ground on the right side of the room. Crouch down and shoot the wall blocking this pipe to open the way. Then use your morph ball ability to roll through the tube and receive an energy tank upgrade.
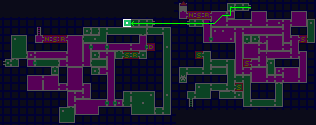
Missile Tank #4
Available: As soon as you go to SRX
In SRX, you eventually reach a room with purple alien bug guys (Zebesian Space Pirates) climbing the walls. Before descending this tall room, you can go across to the door, which leads to a room full of lava. Climb across the rungs in the ceiling of the lava room to reach a missile upgrade.
Missile Tank #5
Available: As soon as you go to SRX
After you clear the atmospheric stabilizer in the bottom-right of the SRX map, a door unlocks in the upper-left corner of the room. Go through that door to find a missile upgrade.
Missile Tank #6
Available: As soon as you go to SRX
After you receive the Charge Beam ability, go through the exit in the upper-right corner of the room. In the next room, shoot the middle of the ceiling and jump up. There is a hidden passage in the upper-left corner of the room. To open it, shoot a missile at the wall in the upper-left corner, then shoot regular bullets to open the rest of the way. Go into the passage using morph ball. There is a missile upgrade underwater, past a bunch of crab-like Zeelas.
Missile Tank #7
Available: As soon as you go to SRX
In SRX, go to the rightmost save room on the map. Shoot at the cracked block in the wall to the right. Jump against the right wall and morph in mid-air and press right to roll through the tunnel. You will have to use the wall kick technique in here. Jump up against a wall, then when you touch the wall, press the jump button again and press the control pad in the direction away from the wall. If you timed it correctly, you will kick off of the wall and jump higher. Samus's feet need to be touching the wall to execute the jump. Use this technique to reach the top of the tall room and get the missile upgrade. Or come back later to get it more easily with the space jump ability.
Missile Tank #8
Available: After getting bomb ability
After receiving the bomb data in TRO, exit the room and go to the right. In the upper-right corner of the room, there is a small ledge with a piece of wall that is separate from the rest. Use your new bomb ability to drop a bomb (press the shoot button while in morph ball). The bombs will break away the piece of wall and you can roll through to get a missile upgrade.
Missile Tank #9
Available: After getting bomb ability
In TRO, the SA-X destroys an exit, and you have to use bombs to drop down to a corridor below. After bombing the floor and going down to the level below, exit to the left. You will be in a tall room. Jump up to the top left of the area and do a wall kick against the right wall, and shoot the wall to the left to break open a hole. Wall kick again to grab onto the ledge that you opened, then roll through with morph ball. Bomb the floor to the left of the block that sticks up. This will activate a rising platform. Use it to reach the missile upgrade up above.
Missile Tank #10
Available: After getting bomb ability
In TRO, there is a room with a blue caterpillar worm thing (called a Zeros) crawling around near some red ones. To the right of these creatures, bomb the bottom-right corner of their area to open a tunnel. Roll through and drop down to find a red Zeros and a missile upgrade.
Energy Tank #4
Available: After getting bomb ability
After getting the previous upgrade, you will reach a second tall room. On the map, this tall room is one square to the right of being below the recharge room. Go up to the third door from the bottom of the tall room and go right until you reach a room with an energy tank.
Missile Tank #11
Available: After getting Hi-Jump and Jumpball abilities
You need to have the Hi-Jump ability to do this. In TRO, after you see the SA-X walk through the corridor below you and go through the door, drop down and walk through that corridor to exit. Jump up onto the platform where a larva is squirming in its shell, then jump up again where you will see the damaged door on the right. Go into the door across from it. In this watery room, jump up to grab the rungs in the ceiling, then climb to the left to get a missile upgrade.
Missile Tank #12
Available: After getting Hi-Jump and Jumpball abilities
You need to have the Hi-Jump ability to do this. In the same watery room mentioned above, go down into the water, then go left. Drop a bomb on the floor near the tall wall on the left. An elevator will rise up. Jump onto it, then jump left to get over the wall. Go through the hatch. Now drop bombs in the middle of the floor on the right side to make another elevator appear. Stand on it, then use the jumpball ability while in morph ball mode to jump and drop a bomb at the small square portion of the wall on the left. The bomb will break open the block. Jump up from the elevator to go through the small hole and reach the missile tank on the other side. When you exit this room, you can put a bomb on the small block to the right of the hatch to create an elevator.
Missile Tank #13
Available: After getting Hi-Jump and Jumpball abilities
In the second tall room, which is filled with larvae in cocoons (Kihunters) after you get Hi-Jump and Jumpball, go up to the top of this tall room and use bombs to reach the hatch at the top right. Continue on until you reach a room with a spike-shooting Dessgeega and another cocoon on the wall. Grab onto the ledge up above, then jump over to the ledge on the right. Climb up into the small gap on the right, then use a bomb on the wall to the right. This opens a secret passage to a missile upgrade.
Missile Tank #14
Available: After getting Hi-Jump and Jumpball abilities
After regaining the Hi-Jump and Jumpball abilities, you will return to the big room at the entrance of TRO by way of a small tunnel. Bomb the block at the end of the tunnel, then go straight up and go through the blue hatch. In this room, kill the Owtches that are slithering along the walls, then go into morph ball mode and jump up against the right wall. At the peak of your jump, place a bomb. If you put it in the correct spot, a small block will be broken. Go into the tunnel there and use bombs to reach the area to the right, where you find a missile upgrade.
Missile Tank #15
Available: After getting Hi-Jump and Jumpball abilities
After regaining the Hi-Jump and Jumpball abilities, you will go back toward the navigation room, recharge room, and save room. Before you go up there, go into the room directly below the save, recharge, and navigation rooms. If possible, don't shoot the Reos that are flying around in here, because otherwise the X that float away from them will make the green thing near the entrance turn into a tall purple and green thing (Kago), making the next step harder. You now have to jump over the purple and green thing(s) blocking your way to the left. It can be difficult to do this without getting hurt, but it is possible. If you succeed, you are rewarded with a missile upgrade on the left side of the room.
Missile Tank #16

Available: As soon as you go to AQA
In Sector 4 (AQA), in the room with large blocks hanging from the ceiling by chains, there is one block that is higher than the others. Land on it and jump up through the ceiling. Go to the far right of this room, then go up as far as you can. Use a bomb on the strip of wall to the left and roll through, then use a bomb on the strip of wall blocking the rungs. Use a bomb in the bottom-left to reveal a hidden missile upgrade.
Missile Tank #17
Available: As soon as you go to AQA
After you get the previous missile tank, climb on the rungs and shoot two missiles to the left. Roll through, then go to the bottom, then go to the right and jump over a gap to reach a ledge on the right. Jump up and shoot the upper-right wall, then go through and get the missile tank.
Energy Tank #5
Available: As soon as you go to AQA
After entering Sector 4 (AQA), you will reach a room with crab-like Zeelas and small tanks of water that aren't electrified. Go through the upper-left door in this room, then make your way up. Ignore the door to the left and instead go through the corridor to the right. You will pass by a small pool of water and more Zeelas. Use the wall jump technique to reach the ladder at the end of the corridor, then go up and through the hatch up here. There is an energy tank in the room beyond.
Missile Tank #18
Available: As soon as you go to AQA
There is a room in Sector 4 (AQA) where the water is electrified and you have to bomb some blocks in the ceiling to give access to the rungs that you can hold onto to go across the room above the electrified water. After reaching the ledge on the other side, jump through the hole in the ceiling. Climb all the way to the top of the ladder and you will go into morph ball mode to go through the hidden tunnel at the very top of the ladder. The hidden room contains Owtches slithering along the walls, and a missile tank.
Missile Tank #19
Available: After lowering the water in AQA
In AQA, after activating the Pump Control Unit to lower the water, climb down the ladder to the left and jump to the right to get a missile tank.
Missile Tank #20
Available: After lowering the water in AQA
From the Pump Control Unit room in AQA, go to the right until you reach a big room with a large pit in the floor. On the left side, there are some electrified wires. Go to the far left side of the room and get rid of any Zeelas crawling around, then run to the right, shooting Zeelas in your way, until you get a speed boost and break through the wall on the right. Keep going right, into the next room, then stop running. Go to the end of the corridor and jump up at the end to get into the water tank up above. Go to the left to get a missile tank.
Missile Tank #21
Available: As soon as you go to PYR
After entering Sector 3 (PYR), run to the right from the Navigation room and shoot open the doors before you hit them so you can get a speed boost. Keep running and you will break through a couple of walls in the first large room. After dropping into an enclosed area with a hatch, don't go through the hatch, but instead, walk up against the hatch and start shooting to the left. Run left and through the hatch to speed boost through the wall in the next room. Shoot the floor to the left and drop down into the room below. Shoot ceiling near the upper-right corner of this room to find a hidden missile tank.
Missile Tank #22
Available: As soon as you go to PYR
After you reach the security room and unlock the green hatches, find the tall room, go up to the top and go into the left hatch. The left wall has some square bricks in it. Bomb the upper square brick to open a path. Roll through the tunnel with Morph Ball to get a Missile Tank upgrade.
Missile Tank #23
Available: After receiving Super Missile ability
After you receive super missiles in PYR, you will go to the left and find that the area has been damaged. Drop down through the hole in the floor and go through the undamaged door. After the save room and recharge room, you find a room with some Side-Hoppers and a purple barrier (Geron). Kill them with Super-Missiles, then grab the missile expansion.
Missile Tank #42 (early)
Available: After defeating B.O.X robot
This is listed as Missile Tank #42 because it may be faster to get it later in the game. If you want to get it now, go up from the room where you fought the B.O.X security robot and go all the way to the left of the room. Do a Speed Boost from the left side of the room. Just before you hit the end of the path, crouch, then jump, then press up-left to do a diagonal Shinespark. If you did it correctly, you will break through the ceiling and through the Speed Boost blocks up above, allowing you to get the Missile Tank.
Energy Tank #16 (early)
Available: After defeating B.O.X robot
This is listed as Energy Tank #16 because it may be faster to get it later in the game. After you get the previous upgrade, go back down to the floor and run left to do a Speed Boost. Shoot the hatch open, but before you go through, crouch, jump, and press left to do a Shinespark through the hatch. You will break through the Speed Boost blocks in the next room and reach an enclosed area. In this area, bomb the bottom left floor until you reach the Energy Tank below.
Missile Tank #24
Available: As soon as you reach NOC
In the first dark room of Sector 6 (NOC), in the bottom-left corner of the room, drop a bomb part of the way up the wall to create a tunnel. Roll through to get a missile upgrade.
Energy Tank #6
Available: As soon as you reach NOC
In the first dark room of Sector 6 (NOC), drop a bomb part of the way up the wall in the bottom-right area of the room. Roll through the tunnel, then use jumpball from the ledge to drop a bomb in the upper third of the wall on the right. A tunnel will appear near the top of the room. (If you make a tunnel lower than the ledge on the left, it is a dead end.) Go through the upper tunnel, then drop a bomb at the end of the tunnel to fall down and get the Energy Tank.
Energy Tank #7
Available: As soon as you reach NOC
In Sector 6 (NOC), you will reach a large room with three large blocks, one of which hides a blue X. Below that, to the left of the ladder, there is a thin piece of wall. Shoot through it and go past where it was, then go through the hatch at the bottom-left corner of this room. Use speed boost in the next corridor to break through the wall to the left, then drop down below and go through the hatch to the left to find an Energy Tank.
Missile Tank #25
Available: After seeing the SA-X in NOC
In Sector 6 (NOC), after seeing the SA-X walk through the room where you hide in the floor, drop down below and go through the hatch. Shoot the little flying creatures, then shoot the wall in the lower left corner of the room. Go through and open the hatch in the left wall. Shoot the block in the floor, then drop down and shoot the square-shaped block on the left side. Crouch and shoot the bottom-left corner of the area. Roll through into a hidden room. Jump onto the ledge to the left and pull up into it, then bomb the left side until you reach a missile tank on the left.
Missile Tank #26
Available: After receiving the Varia Suit
After receiving the Varia Suit in Sector 6 (NOC), go right, then right again, and climb up the ladder, collecting the blue X that are now unable to hurt you. At the top, go through the door on the left. There are pit blocks in the floor between you and the missile tank, so jump over to the missile upgrade to get it.
Missile Tank #27
Available: After receiving the Varia Suit
You will fall through the floor as soon as you collect the previous missile tank. When you do, press left on the control pad to grab a ledge on your way down. Pull yourself up into it, then shoot just left of the middle of the ceiling to reveal a hidden missile tank.
Missile Tank #47 (early)
Available: As soon as you enter NOC
This is listed as Missile Tank #47 because it may be faster to get it later in the game.
In the upper-right part of the NOC map, there is a corridor that you can enter as soon as you enter NOC, but there are many ice-X floating around, making it difficult to make it safely through the hall. If you return here after getting the Varia Suit, you can easily go to the end of the hall and enter the room on the right. Kill the fake Missile Tank and bomb the bottom of the wall on the right. Roll through to get the real Missile Tank.
Energy Tank #8
Available: After getting Ice Missiles
After receiving Ice Missiles in Sector 5 (ARC), go to the right until you reach a tall icy room. Go down until you see a ladder on the right. Grab onto it and climb to the top. Shoot a missile at the Ripper to the left to freeze it, then jump on it to reach the hatch on the left. Go through. Approach the Energy Tank, but shoot it with a missile when you get close, because it's actually a monster. Get up on the small ledge where it was sitting, then roll to the left and use bombs to make a tunnel to the left where you can get a real Energy Tank.
Missile Tank #28
Available: After getting Ice Missiles
After getting the Energy Tank mentioned above, exit the room and go to the bottom of the tall ice room. Go to the bottom-right corner of the room and use jumpball to jump into a hidden tunnel just above the floor to the right. Shoot the ceiling, then kill the Zeela, but don't collect the X that it releases. The X will turn into a Chute Leech. Walk close to the Chute Leech to make it float up, then freeze it with an ice missile. Jump on it to reach the ledge to the left. Kill the Zeela on the ceiling, then don't collect the X that it releases, and it will turn into a Ripper. Freeze it when it is in the center of the room. Jump onto it, then shoot the center of the raised part of the ceiling to find a Missile Tank.
Missile Tank #34 (early)
Available: After getting Ice Missiles
This is listed as Missile Tank #34 because it may be faster to get it later in the game. Return to the first big room of ARC with the glass windows in the background. Go to the upper-left corner of the room by shooting Ice Missiles at the Chute Leeches and jumping up them. Enter the upper-left hatch in this room and get the Missile Tank.
Missile Tank #29

Available: After getting Ice Missiles
After you return to the first large room of Sector 5 (ARC), you will see a big shadow flying around in the background. Go through the hatch at the bottom-left of this large room. Kill the Geruta on the ceiling with two missiles, then drop a bomb in the top-right corner of the raised part of the ceiling to reveal a missile tank.
Missile Tank #43 (early)
This is listed as Missile Tank #43 because it may be faster to get it later in the game. After you reactivate the cooling unit in Sector 3, you can go to a room that you previously could not access because the green hatches were locked. Go to the tall room in PYR and enter the bottom-right door. Shoot the top middle of the platform to get the Missile Tank.
Energy Tank #17 (early)
This is listed as Energy Tank #17 because it may be faster to get it later in the game. After getting the above Missile Tank, shoot the bottom-right of the wall in this room, then go through. On the ledge above, there is a Sova (flaming monster). Shoot it with an Ice Missile to freeze it, then jump on it and jump through the hole in the ceiling above. Go through the hatch up above. In the next room, go down to the bottom, then shoot the flaming Sovas with Ice Missiles and make your way up the platforms. Jump up to reach the Energy Tank in the upper-right corner.
Missile Tank #44 (early)
This is listed as Missile Tank #44 because it may be faster to get it later in the game. After getting the previous Energy Tank, go up to the narrow passage to the left and roll to the left to reach a Missile Tank.
Missile Tank #45 (early)
Requirements: Varia Suit
This is listed as Missile Tank #45 because it may be faster to get it later in the game. In the first big room of PYR, go through the middle left hatch. This room is unsafe unless you have the Varia Suit. Grab the rungs on the ceiling and go to the left, avoiding spouts of flame and the Desgeegas on the ceiling. At the left side of the room, go through the hatch and get the Missile Tank in the next room.
Energy Tank #18 (early)
Requirements: Speed Boost
This is listed as Energy Tank #18 because it may be faster to get it later in the game. In the same room where you got Missile Tank #45, shoot through the left wall and shoot your regular Beam while Speed Boosting to the left. When you reach the left, crouch and jump to Shinespark upward. In the area above, shoot the middle of the wall to the right so that you can enter the small rectangular area. While in that area, jump up and shoot the right wall. Go right and fall down below, then bomb the floor to make an elevator come up. Jump from the elevator to the ledge above, then shoot the square block in the ceiling. Jump up above, then shoot the left wall. Go down and collect the Energy Tank.
Missile Tank #30
Available: After returning to the Main Deck when Adam tells you to check for survivors
When you first return to the main deck after Adam restores power to the main elevator, go to the right from the elevator, then run back to the left to get a speed boost as you go through the hatch. You will go through the wall that the SA-X broke open to the left of the elevator, and will speed boost through the wall in there to reach a missile tank.
Missile Tank #31

Available: After returning to the Main Deck when Adam tells you to check for survivors
After you release the Etecoons and Dachoras from the Habitation Deck, walk to the right and shoot the block in the floor. Fall through the floor where you shot it, then walk to the left and shoot the block in the floor there. Fall through, then walk to the right to get a missile tank.
Missile Tank #46 (early)
Available: After rescuing the Etecoons and Dachoras
This is listed as Missile Tank #46 because it may be faster to get this item later in the game. After you rescue the Etecoons and Dachoras, Adam tells you to return to Sector 5 (ARC) to download the Power Bomb data from the Data Room. Before you go there, drop down to the bottom of the first tall room in ARC and open the bottom-left hatch to find a room with a box that has a Missile Tank in it. Jump up through the bottom-left of the box to get the Missile Tank.
Power Bomb Tank #1

Available: After receiving the Power Bomb ability
After receiving the Power Bomb ability in Sector 5 (ARC), go right, shoot the floor in the icy room, and fall down to the bottom. Go through the door on the left. Use a power bomb to break a hole in the floor. Drop down and go through the hatch. In the next room, you will encounter the SA-X. Jump over the tall wall to the left, and drop a Power Bomb. When it goes off, SA-X will start chasing you, so roll through the upper tunnel that your Power Bomb revealed, jump over any beams the SA-X shoots at you, and hurry to the left to go through the hatch. The SA-X will not follow you into here. Use a power bomb to break the wall, then go to the left to get the Power Bomb upgrade.
Power Bomb Tank #2
Available: After receiving the Power Bomb ability
From the place where you got the previous power bomb upgrade, climb up the ladder, then use a power bomb near the ceiling to reveal another ladder. Climb up and freeze the Rippers to climb to the top of the room. Go through the hatch and get the power bomb tank.
Power Bomb Tank #3
Available: After receiving the Power Bomb ability
After receiving the previous power bomb tank, you will eventually reach a corridor with a large living green barrier that you need to destroy with a power bomb. Once you get past it, you will be back in a large icy room. Up above, use a Power Bomb near another living barrier to destroy it and break open the wall near it. Roll through. There are many pit blocks up above, and you need to freeze the Rippers and jumpball on them to go along the upper path without falling through the pit blocks. If you make it across, you get a Power Bomb Tank.
Power Bomb Tank #4
Available: After you get stuck on the elevator to the Main Deck
After the elevator stops midway and you see a Core-X come out of the frozen Ridley, you will drop down into a darkened passageway. As soon as you reach the floor, drop a power bomb to reveal a narrow passage to the left. Near the left end of the narrow passage, drop a power bomb or a regular bomb to reveal a narrow passage that leads up to a Power Bomb Tank.
Missile Tank #32
Available: After you get stuck on the elevator to the Main Deck
From the power bomb upgrade mentioned above, you will pass through a part of the darkened corridor where some slime-spitting enemies crawl through the ceiling. When you exit to the right, there are some boxes in the way. Drop a Power Bomb to reveal a hidden passage up above that contains a missile tank.
Energy Tank #9
Available: After visiting your ship after getting stuck on the elevator to the Main Deck
After you go through the Reactor Core room, you will go right through a hallway where there are a bunch of Space Pirates. A small hallway here contains an Energy Tank.
Missile Tank #33
Available: After visiting your ship after getting stuck on the elevator to the Main Deck
After receiving the Energy Tank mentioned above, you will head down through another room with Space Pirates. After dropping down to the third ledge, drop a Power Bomb at the spot where two sets of vertical pipes connect to the ledge that you are standing on. Drop down one more level, get past the Space Pirate, and then use more bombs if necessary to open a tunnel to the left that contains a Missile Tank.
Power Bomb Tank #5
Available: After SA-X chases you in TRO
After you fight Yakuza and regain the Space Jump ability, you will encounter SA-X in the TRO sector. Once you escape from SA-X, you will have to shoot some missiles into the floor to get to a lower level. From there, head left until you get to a large metallic room. Space Jump to the left and up. Go up the narrow area to the left, then shoot at the top of the thin wall to the right to break open a path, then shoot the wall to the right to break it open. There is a Power Bomb Tank at the end.
Energy Tank #10
Available: After defeating Nettori and receiving the Plasma Beam
After receiving the Plasma Beam, exit to the right and go down to the bottom of this metallic room, and go through the hatch to the left. Go through the green corridor and exit to the left. Go to the top of the tall green room and exit to the right. In this room with Owtches slithering along the walls, there is a hidden passage in the far right wall. Jump against the wall to grab the hidden ledge. Roll through to the right, then jump up into the narrow space to the right of the hanging wall and shoot to the left near the top. There is a hidden Energy Tank in the right side of the hanging wall, near the top.
Power Bomb Tank #29 (early)
Requirements: Space Jump
This is listed as Power Bomb Tank #29 because it may be faster to get this item later in the game. Make your way to the first room of TRO (to the right of the Recharge Room) and roll through the bottom-right tunnel. In the next room, go down and through the bottom-left hatch. Go through to the next room and make your way down the tall room, then go through the first door on the left. The floor in this room is partly made of Pit Blocks. Use a Power Bomb to reveal the Pit Blocks. Then hang from the rungs at the top of the room, and shoot an ice missile downward at a Ripper. Freeze it again until the second Ripper is to the left. Then land on the first Ripper and freeze the second one before it gets too far away. Then morph into a ball and carefully jump onto the second Ripper, then jump from there to the Power Bomb.
Power Bomb Tank #30 (early)
Requirements: Space Jump
This is listed as Power Bomb Tank #30 because it may be faster to get this item later in the game. In the same room, fall down through the pit block below the Power Bomb Tank that you just collected. You will fall through another Power Bomb Tank.
Missile Tank #34
Available: After getting Space Jump and returning to Sector 5 (ARC) to stop Nightmare
When you go back to Sector 5 (ARC) to stop the Nightmare, go to the first large room. Space Jump to the upper-right area of this room. Kill the Chute Leeches on the floor, then run from the far right until you get a speed boost. At the end of this ledge, crouch and press jump, then left, to do a shine spark to the left. You will go through to the room on the left and shinespark through the missile tank.
Power Bomb Tank #6
Available: After getting Space Jump and returning to Sector 5 (ARC) to stop Nightmare
If you performed a shinespark to get the missile tank mentioned above, you will break through the wall to the left of that missile tank and reach a room where you can get a power bomb tank.
Power Bomb Tank #23 (early)
Requirements: Power Bomb
You will pass through a broken hatch that used to be a red hatch before Nightmare destroyed it. In this room, shoot the ceiling to break a hole in it. Then use a Power Bomb to break a hole in the ceiling just above the hatch. Shoot the gate and kill the Space Pirate(s). Shoot the the upper-left ceiling, and shoot upward through the next upper-left ceiling. Shoot open both gates and shoot through the middle floor to find a Power Bomb Tank.
Power Bomb Tank #22 (early)
Requirements: Power Bomb
This is listed as Power Bomb Tank #22 because it may be faster to collect this item later. After getting the previous Power Bomb Tank, go back down to the hatch in the wall on the right. Go through, then go to the right through the space tunnel. While in the right side of the space tunnel, use a Power Bomb to reveal a Power Bomb Tank up above. Jump up to get it.
Energy Tank #11
Available: After returning to Sector 5 (ARC) to stop Nightmare
As you make your way through ARC to reach the Nightmare, you will fall into a tall room that contains water. As you fall, push against the right wall. You will grab a small As you fall, shoot a missile to the left, a couple of squares below the pipe in the background under the water. (If you miss it, come back after you get the Gravity Suit.) Then pull yourself into the narrow passage to reach a hidden room. Don't use a Power Bomb in here, because doing so will cause an elevator to block the path to the power up. In morph ball mode, use jumpball go left across the middle ledge and avoid the pit blocks along the way. There is a hidden passage in the ledge up above, near the left side. Jump up through that hidden passage, then go to the right and jump over the pit blocks in this ledge, which are directly above the pit blocks in the middle ledge. Carefully use jumpball to get over the pit block immediately to the right of the raised ledge. If you are successful you will reach the Energy Tank to the right. There is a pit block to the right of the tank that you can use to exit the room more quickly.
Power Bomb Tank #7
Available: After returning to Sector 5 (ARC) to stop Nightmare
As you make your way through ARC to reach the Nightmare, you will pass through a bunch of watery rooms with Space Pirates and Aquatic Space Pirates. Eventually you find yourself in some non-watery rooms once again. In a room with some Geruta on the ceiling, shoot the ceiling directly above the Geruta to break it open. Jump up there and exit to the left. There are a bunch of Zeela in this room. The step at the bottom-left of the room hides a Power Bomb Tank. Bomb the top of the step to open the hidden passage leading to the Power Bomb Tank.
Power Bomb Tank #8
Available: After returning to Sector 5 (ARC) to stop Nightmare
After getting the previous power bomb tank, exit to the right, then continue right and jump up onto the platform. Jump up to the top from there and use a Power Bomb to open a secret passage to the left. Roll through it, and jumpball just a few squares before the left side of the narrow passage to jump up into a hidden tunnel that leads to a Power Bomb Tank on the left.
Energy Tank #12
Available: After returning to Sector 5 (ARC) to stop Nightmare
After you kill the door eyeball (Gadora) on your way to the Nightmare in Sector 5, you will see an Energy Tank to the right. Don't take the direct route, because there are hidden pit blocks that will drop you into the Nightmare's room before you can reach the energy tank. Instead, drop a bomb against the middle of the wall that hangs over the small step in the floor. You will break open a hidden passage leading to the right. Roll through it and you will fall through pit blocks to land on the Energy Tank.
Power Bomb Tank #9
Available: After killing Nightmare
After killing Nightmare, exit Nightmare's room to the left. Keep going left until you reach a tall room. Go to the bottom, and exit to the right. Go to the bottom of this room, killing all of the Space Pirates and Skulteras in the lower area. Then go to the far left of the room and run to the right into the next room. When you break through the two thin pieces of wall, crouch down, then walk back to the spot exactly between where those two walls were. Jump straight up to do a shinespark through a line of speed boost blocks in the ceiling. Get the Power Bomb Tank to the left. There are pit blocks to the left that you can use to exit this room.
Missile Tank #35
Available: After speed boosting into AQA after killing Nightmare
After receiving the Power Bomb Tank mentioned above, do a speed boost to the right and you will enter Sector 4 (AQA). Keep running, then jump once you are going up the second ramp. If you did it correctly, you should speed boost through some blocks near the ceiling and get access to the hatch to the right. Go through to enter an underwater environment. Walk right and drop down from the ledge and open the hatch to the right. Shoot your way through the cracked bricks in this room to reach a missile tank on the right.
Power Bomb Tank #10
Available: After speed boosting into AQA after killing Nightmare
After you leave the room mentioned in the paragraph above, roll into a hidden passage in the wall across from the hatch that you come out of. You will enter a small room that contains a Power Bomb Tank.
Power Bomb Tank #11
Available: After speed boosting into AQA after killing Nightmare
From where you got the last upgrade, go back into the last room and drop down to the bottom of the tall room. Exit left, then drop a Power Bomb in the glass tunnel. Shoot a missile at the missile blocks in the left-hand ceiling. Jump up onto the ledge on the right side to reach an area up above where an Evir or two is floating around. Use bombs to break open the wall in the top-right corner of this area. Roll through to get a Power Bomb Tank.
Energy Tank #13
Available: After unlocking red hatches
After you reach the security room in AQA and unlock the red hatches, exit the room to the right, then space jump up through the tall room until you see an indentation in the wall to the right. Roll through the hidden passage in the middle of this indentation. Go to the bottom of this room and place a Power Bomb, then go up to the top of the room to avoid absorbing the X that come from killing the Zeela. The X will turn into two Golden Zeela in a compartment just above the door. Shoot two missiles at the missile blocks on the left side of this compartment, then kill the Golden Zeela with charged shots or missiles. The hatch in the corner should unlock. Go through. Use a Power Bomb in this room to clear the way to the Energy Tank in the upper-right corner.
Missile Tank #36

Available: After unlocking red hatches
After receiving the missile tank mentioned above, make your way back to the tall room. Space jump to the top and exit to the right. Go right to find a glass tunnel. Exit this room to the right, then go right again. You will find a second glass tunnel. Drop a Power Bomb in it, then shoot through the right-hand floor of the tunnel with a missile. Get the Missile Tank down below.
Missile Tank #37

Available: After unlocking red hatches
After receiving the missile tank mentioned above, go back up to the glass tunnel and exit the room to the right. Make your way up the tall room and exit at the top right. Go right through the small glass tunnel, and in the next room, shoot the upper part of the wall to the right and roll through, then jump up to the ledge above. Keep going up until you reach an area with a brown balloon-like creature (Powamp) blocking the way. Stay at a distance from it and freeze it with an ice missile, then roll past it. Drop down to the area below to the right, then stand at the far left and start running to the right through several rooms. As soon as you are in a room with a Kago blocking the way, crouch as soon as you hit top speed. There is a crab-like creature (Yard) at the far right, near the Kago. If you hit it, you will lose the speed boost. Once you have crouched, jump and press up-right to do a diagonal Shinespark through the Kago, destroying it. Get the Missile Tank to the right.
Power Bomb Tank #12
Available: After unlocking red hatches
From the missile tank mentioned above, go to the right side of the room and roll to the right to reach a hole in the floor. Drop down to the room below and kill the enemies while running to the left. Stop at the door and run to the right. Crouch just after the last mound before the exit, then stand under the hole that you dropped down from a moment ago and press jump to do a shinespark back up to the last room. Press right while you fall to reach the Power Bomb Tank.
Missile Tank #38
Available: After getting Diffusion Missiles
After receiving the Diffusion Missile ability, go left from the Data Room, shoot a diffusion missile to freeze the blowfish creatures (Powamps), then roll to the left. Walk through the wall in the bottom left. Kill the purple Geron that appears and blocks the way, then go to the left side of the room, and crouch and shoot the wall just under the electrified wires. Roll over to the Missile Tank.
Power Bomb Tank #13
Available: After getting Diffusion Missiles
After receiving the missile tank mentioned above, go back to the room where you froze the blowfish-like Powamps with a diffusion missile after receiving the diffusion missile ability. Exit through the top-left exit. In the large metallic room, go through the bottom-left exit. Continue going left to a room with a crab-like Sciser. Drop a Power Bomb and roll through the tunnel to the left. You will drop down to an area with broken wires. Roll to the bottom left and drop a Power Bomb to get a Power Bomb Tank.
Missile Tank #39

Available: After killing the security robot B.O.X II and getting Wave Beam
In Sector 6 (NOC), After recovering your Wave Beam ability, exit the boss room to the right and go to the far right side of the room. Shoot through the gate to open it, and get the missile tank beyond.
Energy Tank #14
Available: After the Restricted Lab is jettisoned from the station
After the Restricted Lab is ejected from the station and you return to Sector 1 (SRX), you reach a room with metal tubes and a few Rippers floating around. Shoot a diffusion missile at the wall to the right of the Rippers. This opens a path to an Energy Tank. Roll through to get it.
Power Bomb Tank #14
Available: After the Restricted Lab is jettisoned from the station
After receiving the energy tank mentioned above, you will go through a room full of green liquid at the bottom and some Yamebas floating around. In the room to the right of that, shoot the floor just to the right of the center. Go to the left and use charged shots to kill the crab-like Yard in the box. Don't collect the X that appear. The X will become a Geruta hanging from the ceiling. Kill it with missiles, but again, don't collect the X. They will turn into a golden Space Pirate. Hit it from behind with charged shots. When it is dead, the hatch to the right will open, giving access to a Power Bomb Tank.
Power Bomb Tank #15
Available: After fighting Ridley-X and regaining the Screw Attack ability
After regaining the Screw Attack ability, go to the room where you fought the door eyeball (Gadora) just before the room where you got the Charge Beam. Fall down the pit blocks to get to the floor of this room. Do a screw attack to break the blocks above the narrow tunnel to the left, allowing you to walk to the left and go through the hatch. Keep going left to get to the save room. Go to the left wall of the save room and shoot the door open, then start charging your beam. Run to the right and shoot your charged shot at the hornoads in the next room, and keep going to get a speed boost. Once you are in the room with a ladder in front of you, crouch down to hold the shinespark energy. Walk right and jump while walking to do a screw attack while falling to the right. This should kill the enemies on the wall below. Once you are at the bottom, walk to the right until you are against the right wall. Jump while standing still to do a shinespark to the top, then shoot the left wall to reveal a Power Bomb Tank.
Energy Tank #15
Requirements: Speed Boost
After receiving the Power Bomb Tank mentioned above, go back to the save room where you started the speed boost before, and start another speed boost. This time, crouch when you are in the room where you fell down through the pit blocks. Jump while walking to do space jumps up to the top-left door. Shoot it open, then jump while standing still and press left to do a shinespark through the door. In the next room, you will hit the ramp and keep running. Once you are near the left side of the room, crouch to hold the speed boost energy, then walk to the left side of the area on the left where the statue used to be. Jump while standing still to do a shinespark straight up through some speed boost blocks in the ceiling. Go to the right to get the Energy Tank.
Missile Tank #40
Requirements: Speed Boost or Space Jump
This missile tank is in the lava room, which is directly below the first large room to the right of the navigation, save, and recharge rooms. There is a missile tank in the top left corner of the lava room, which you can access using space jumps, or a shinespark from the right.
Missile Tank #41
Requirements: Gravity Suit
Also in the SRX lava room mentioned above, just drop to the bottom of the lava and roll through the wall to the right to find this missile tank.
Power Bomb Tank #16
Requirements: Screw Attack
Go back to the first large room of SRX where there are Zombies on the ledges, and go through the top-right exit. Screw attack through the ceiling to find a Power Bomb Tank.
Missile Tank #42
Requirements: Speed Boost
After getting the above Power Bomb Tank, go back to the first big room of SRX with all the Zombies. Go down to the bottom and go through the door on the bottom left with the blue hatch. Use the Space Jump to find a narrow hole in the upper-left wall that you can go through with Morph Ball. Use the Screw Attack on the wall to the left, then open the hatch to the left and go through. Make sure to get a Speed Boost as you continue going left into Sector 3 (PYR). After you go through the hatch to PYR, jump at an angle (to maintain the Speed Boost) and do a Screw Attack through the wall to the left, then keep doing the Screw Attack through the next wall on the left. If you did it correctly, you will still have the Speed Boost while doing the Screw Attack, allowing you to break through the second wall and access the Missile Tank there.
Energy Tank #16
Requirements: Speed Boost
After you obtain the previous Missile Tank, shoot the floor to the right and fall down below. Start Speed Boosting to the left. Just before you enter the next room, jump at an angle to do a Screw Attack while Speed Boosting. If you did it correctly, you will break through the wall to the left. At the far left side of this area, shoot the floor to fall below and get an Energy Tank.
Power Bomb Tank #17

Requirements: Power Bomb
As soon as you get the previous Energy Tank, Screw Attack up above and use a Power Bomb to reveal a tunnel to the left. Go through that tunnel to get a Power Bomb Tank.
Power Bomb Tank #18
Requirements: Speed Boost
After you get the Power Bomb Tank, go to the left side of the area to fall through some pit blocks. Exit to the left, and make your way to the bottom right of the big room. Open the gate to the right, and make sure you Speed Boost into the next room. You will break through the blocks on the right side of the floor. Down below, bomb the upper part of the left wall, then roll through the hole that you opened. Get the Power Bomb Tank in the upper-left part of this room.
Missile Tank #43
Requirements: Access to PYR
After getting the previous Power Bomb Tank, go into the room to the right and fall all the way down to the bottom. Go through the door on the right. Get on top of the big block in the middle and break a hole in the top to find a hidden Missile Tank.
Power Bomb Tank #19
Requirements: Speed Boost, Gravity Suit
After you get the previous Missile Tank, break a hole in the bottom right of the same room, then go through the hatch to the right. Shoot the gate open, then get into the lava. Go to the right and break a hole in the wall to the right. Then go a little bit to the left, and start Speed Boosting to the right as you go through the hatch. In the next room, as soon as you start Speed Boosting, crouch down and then walk to the right side of the room, then jump straight up to Shinespark through the ceiling. You will pass through a Power Bomb Tank on the way.
Power Bomb Tank #20
Requirements: Screw Attack
After you hit the ceiling after collecting the previous Power Bomb Tank, fall down until you reach a ledge on the left. Screw attack through the ceiling of this ledge, then Screw Attack down into the room with the Power Bomb Tank.
Energy Tank #17
Requirements: Ice Missiles
After you get the previous Power Bomb Tank, fall all the way back down into the lava and go to the left, into the previous room. Screw Attack through the wall to the left, and Space Jump up to the upper-right of the room, where there is an Energy Tank.
Missile Tank #44
Requirements: Ice Missiles
After getting the previous Energy Tank, go up to the narrow passage to the left and roll to the left to reach a Missile Tank.
Power Bomb Tank #21
Requirements: Power Bomb, Gravity Suit
Roll to the left, shoot through the gate, and exit through the hatch. Keep going to the left until you can't go any farther left. Use a Power Bomb to break a hole in the floor where the lava is. Drop into this hole and go to the right, then jump up through the ceiling to reach the upper-right. Fall down below through an invisible hole and go to the left. Keep rolling left through invisible holes, then jump up through an invisible hole on the left. Go all the way up and roll into the invisible path in the upper-right. Keep going to the right to reach the Power Bomb Tank.
Missile Tank #45
Requirements Varia Suit
Return to the first room of PYR. Go through the middle-left door. Keep going to the left until you reach a Missile Tank.
Energy Tank #18
Requirements: Speed Boost
In the same room, shoot through the left wall and shoot your regular Beam while Speed Boosting to the left. When you reach the left, crouch and Shinespark upward, then collect the Energy Tank to the right.
Power Bomb Tank #22
Requirements: Power Bomb
In the same room, go back down below and do a Screw Attack through the floor to the right. Go through the hatch to find a tunnel to Sector 5. Before going through the space tunnel, Screw Attack through the ceiling near the hatch to Sector 3. Go up above and shoot the block to the right to get a Power Bomb Tank.
Power Bomb Tank #23
Requirements: Power Bomb
Go through the space tunnel to reach Sector 5. When you get there, Screw Attack through the ceiling above the hatch that you came through. Shoot the gate and kill the Space Pirate. Screw Attack through the upper-left ceiling, and Screw Attack upward through the next upper-left ceiling. Shoot open both gates and shoot through the middle floor to find a Power Bomb Tank.
Missile Tank #46
Requirements: Access to ARC
Go to the first big room of Sector 5, where the glass is broken due to the Nightmare's attacks earlier in the game. Go through the bottom left door and continue going left until you reach a room with a box that has a Missile Tank in it. Jump up through the bottom-left of the box to get the Missile Tank.
Power Bomb Tank #24

Requirements: Screw Attack
In the same room, Screw Attack through the wall to the left to reach a hidden room with a hatch. Go through the space tunnel to reach Sector 6 (NOC). In Sector 6, Screw Attack through the left wall. Then go down and use the bottom-left hatch. Screw Attack through the raised block in the floor, then open the hatch to the right and stand partly in it, then start Speed Boosting to the left. Before you hit the wall, shoot open the hatch on the left and Screw Attack diagonally through it, maintaining the Speed Boost. Continue Space Jumping to the left to break through the wall to the left. Still Space Jumping, go through the hatch to the left. As you go left, you will break through the Speed Boost blocks in the walls. When you reach the area with the Power Bomb Tank, stop Speed Jumping and get the tank.
Note that if you can't get it to work this way, then in the room where you started the Speed Boost, just diagonally jump onto the ledge with the red hatch, shoot it open, and jump and press left to do a Shinespark to the left (instead of trying to do a fast Screw Attack through the door). You will go all the way through the walls, past the Power Bomb Tank. Go to the bottom of the room and build up a Speed Boost. Then run to somewhere near the middle of the room and do a Shinespark straight up. If you aimed correctly, you will break through the wall to the left of the Power Bomb Tank up above. You can go to the right after you hit the ceiling in order to get the Power Bomb tank.
Power Bomb Tank #25

Requirements: Screw Attack
In the same room, after you collect the tank, you will fall through some pit blocks. Speed Boost to the right until you are almost at the end of the ledge. Crouch, then jump and press left to Shinespark up the small slope. Then, before you reach the Boost Blocks to the left, jump in a Screw Attack and continue Space Jumping upward several times. Then, while still doing the Screw Attack, allow yourself to fall through the ceiling of the area with the Power Bomb Tank in it.
Power Bomb Tank #26
Requirements: Speed Boost
Go to the bottom-left of Sector 6 (NOC) to return to the Restricted Zone. Start Speed Boosting and go as far left through the Restricted Zone as possible. When you reach the space tunnel, crouch, then stand behind the leftmost vertical band of the glass tunnel, then jump diagonally to do a Space Jump upward through the space tunnel. Note that if you instead do a Shinespark straight up, you will have to see a cutscene in the Navigation room. Either way, you will get a Power Bomb Tank here.
Power Bomb Tank #27
Requirements: Screw Attack
Afterward, fall back down below and shoot the floor on the right to get back into the glass tunnel. Go to the right until you are back in the watery room where you fought the security robot (B.O.X II). Go to the right and exit this room to the right. Screw Attack through the ceiling above the hatch. Use a Power Bomb to reveal the nearby Power Bomb Tank and pit blocks. Go to the top and roll through the tunnel up above. There are pit blocks to the right, so try to unmorph as soon as you are out of the tunnel so that you can quickly Space Jump up to the top-right corner.
Energy Tank #19
Requirements: Screw Attack
Exit the previous room through the hatch to the left. Screw Attack through the walls to the left, then go through the hatch to the left. Go up through the next room and through the red hatch. Screw Attack through the raised block in the middle of this room, then Speed Boost toward the right. Go through the hatch on the right, then crouch, jump, and press right to do a Shinespark through the wall on the right. Go through the hatch at the end. In this room, place a bomb in the middle of the first platform, then place a bomb in the middle of the second (smaller) platform, then place a bomb at each end of the third platform, then place a bomb left of the middle of the fourth platform. If you did it correctly, small elevators will make a continuous walkway between all four platforms. If you bomb an incorrect spot, an elevator will rise up from a platform, blocking the path. Once you have a continuous walkway, speed boost, crouch, jump, and press right to Shinespark through the block on the right side of the room to get the Energy Tank.
Missile Tank #47
Requirements: Missiles, Bombs
Go to the left until you can't go left anymore. Go up and into the hatch above where you just were. Shoot through the blocks in this room to go to the right. In the next room, kill the fake upgrade with a missile, then bomb or Screw Attack the blocks at the bottom of the right wall. Roll through and get the real Missile Tank at the end.
Energy Tank #20
Requirements: Screw Attack
Go back to the first room of NOC. Screw Attack through the bottom left floor, then through the left wall. Keep going left to reach Sector 4. In the next room, roll through the tunnel to the left. Then, shoot the small rectangular blocks of the floor with missiles, then go all the way to the bottom of the room. Screw Attack through the bottom-right floor. Then go through the hatch at the bottom to reach Sector 2 (TRO). Screw Attack through the left wall, then go up the tall room and into the blue door on the left. In the Security Room, Space Jump to the top-left wall and Screw Attack through. Go through the hatch beyond. In this room, the entire floor is made of pit blocks, so carefully Space Jump to the top-left of the room to collect the Energy Tank there.
Power Bomb Tank #28
Requirements: Screw Attack
In the same room, go to the right of where you got the Energy Tank and then fall through the pit blocks. There is a Power Bomb Tank to the left.
Power Bomb Tank #29
Requirements: Space Jump
Make your way to the first room of TRO (to the right of the Recharge Room) and roll through the bottom-right tunnel. In the next room, go down and through the bottom-left hatch. Go through to the next room and make your way down the tall room, then go through the first door on the left. Carefully Screw Attack to the upper-left corner of the room (the floor is made of pit blocks) to reach the Power Bomb Tank in the upper-left.
Power Bomb Tank #30
Requirements: Space Jump
In the same room, fall down through the pit block below the Power Bomb Tank that you just collected. You will fall through another Power Bomb Tank.
Power Bomb Tank #31
Requirements: Screw Attack
Return to the room where you fought Zazabi, in the bottom-right of TRO. Space Jump to the top-right of this room, and Screw Attack through the upper-right wall, then go through the hatch to the right. Fall to the bottom-left of this room and Speed Boost to the right. Crouch when you get to the far right. Jump diagonally up to the platform above you, then jump and press left to Shinespark up the small slope to the left. If you did it correctly, you will Speed Boost across the pit blocks to the left. Before you reach the end, crouch and jump diagonally to the next platform, then jump and press right to Speed Boost to the right. Do the same thing on the platforms all the way to the top of the room. If you do it correctly, you will reach the Power Bomb Tank in the upper-left of the room.
Missile Tank #48
Requirements: Screw Attack
In the same room, go back to the bottom-left of the room. Use a Power Bomb to reveal a hidden Missile Tank in the part of the wall that hangs down. There are two Speed Blocks to the left of this tank. Go to the bottom-right corner and Speed Boost to the left. Before you hit the left, crouch, then jump diagonally and Space Jump up until you are in line with the two Speed Blocks to the left of the Missile Tank. Shoot your beam to stop Space Jumping, then press jump and then right to Shinespark through the Speed Blocks, reaching the Missile Tank.
Power Bomb #32
Requirements: Power Bomb
From the room in Sector 2 (TRO) where you fought Zazabi, go through the upper-left hatch, then climb up to the room above and exit through the hatch on the left. Keep going left, through a save room, then go up to the top of the next room. Go through the hatch on the right. Keep going right until you have to go up. Then go to the right, past the gates that you had to open when SA-X was chasing you earlier in the game. Use a Power Bomb in the next room and exit to the right. Go up and roll through the tunnel at the upper-right of this room. Go to the right until you reach the Central Reactor Core. Space Jump to the upper-left and exit through the hatch. Make your way up through the next room and open the red hatch at the top. Space Jump to the top of the next room and exit through the hatch at the top. When you reach the Main Deck, go left to reach the next room, then go up to the top, and if there is an organic green barrier (Gelon), Screw Attack through it. Go through the upper-right hatch. In the next room, use Morph Ball to enter the secret passage in the upper-right part of the room. Jump to make your way through the invisible tunnel until you reach the Power Bomb Tank at the bottom.
 Get Metroid Fusion by subscribing to Nintendo Switch Online